
Introduction#
If you work with Kubernetes on a daily basis and maintain the underlying infrastructure, you are probably familiar with the challenge of managing the lifecycle, especially with updates coming almost every month.
Although the initial deployment and creation of a cluster are not a problem, as there are many solutions available (for example: kubespray), it is often during day-to-day operations (the so-called Day 2) that things get tricky, particularly in hybrid environments with different deployment methods.
Maintaining a fleet of clusters in the same way (who hasn’t dreamt of having a single CNI and CSI?), regardless of the underlying infrastructure, whilst keeping them up to date and without compromising on resilience, requires constant hard work. This is why it is often recommended to opt for managed solutions, particularly in the cloud for the sake of convenience, where some of the resources (in this case, the Control Planes) are managed by the provider.
This leads to the question: is it really possible to have a declarative, fully automated approach while following the GitOps methodology, but above all remaining in control of technical choices regardless of location?
This is exactly where Cluster API (often called CAPI) comes into play. More than just a deployment tool, it is one of the solutions from the Kubernetes community that I would describe as ‘native’, thanks to its philosophy, closely aligned like managing a Pod – which we’ll discuss a little later – particularly in order to meet this need for automation and cross-platform standardisation.
Ready to dive into the heart of this tool? Let’s go!
This article is the first part of a series dedicated to Cluster API. It focuses on the fundamental concepts and the overall architecture. Next, the plan is to deploy an initial cluster, but above all to get our hands dirty!
The philosophy and key concepts#
One Kubernetes cluster to rule them all!#
Before going into detail about the technical aspects, it is worth briefly outlining the project. Cluster API is an open-source tool hosted by the Cloud Native Computing Foundation (CNCF). It is developed and maintained by the Cluster Lifecycle Special Interest Group (SIG) within the Kubernetes community. The project has attracted a large number of contributors over the years, ensuring a certain level of maturity of the product as well as its sustainability and stability for production environments.
In terms of how it works, Cluster API is based on a simple idea: using a Kubernetes cluster, known as a Management cluster, to manage the lifecycle of other clusters, referred to as Workload clusters. This mechanism works through the use of Custom Resource Definitions (CRDs), which will be discussed later, as well as the use of reconciliation loops.
Thus, the Kubernetes orchestrator is used to provision and manage the infrastructure of other clusters.
Managing clusters like you manage Pods#
Just above, I mentioned the reconciliation loop, which is used, among other things, to manage the infrastructure. You know, that same mechanism that, when creating a Deployment, manages the lifecycle of Pods between what you have defined (replicas, image, etc.), also known as the desired state, and what actually exists in the cluster, in other words, the current state. This loop has a single objective: to ensure that the desired state is what is running within your cluster.
To achieve this, Pods are not ‘updated’ in the same way as you would run an apt upgrade on a Debian virtual machine. In fact, a Pod with the new defined properties (for example, a new image version) will be created and the old one deleted if and only if this new Pod functions correctly.
It’s exactly the same with Cluster API: resources such as virtual machines are Kubernetes objects that are monitored by a reconciliation loop to ensure that their defined attributes match those of the current infrastructure (CPU, memory, disk space, etc.).
By default, virtual machines are not patched, but follow the same logic as Pods: a new one will be created and the old one deleted. As you can see, CAPI fits perfectly with the sequential approach to rolling updates.
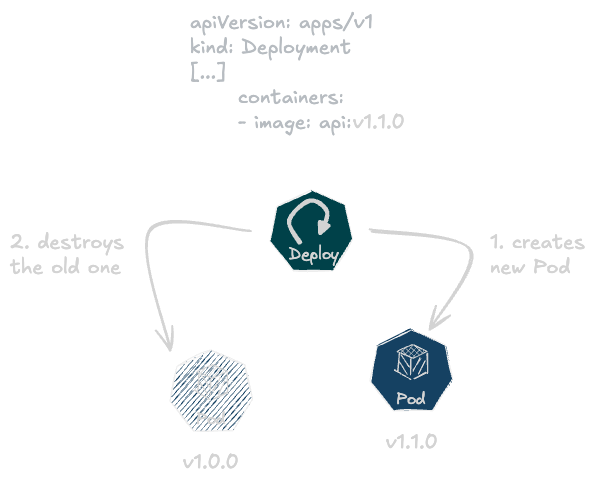
The Kubernetes reconciliation loop in action with a Deployment
A quick word on architecture!#
The architectural model is based on a clear separation of roles:
The Management cluster acts as the system’s brain. It hosts the Cluster API components and controllers, and it is within this cluster that the desired configuration of the other clusters is defined.
The Workload clusters are deployed by the Management cluster. It is on these clusters that applications or tools will run.
The components under the hood#
Cluster API can be deployed in several ways, but the approach that is most widely agreed upon is to use the official operator, as it is very easy to deploy with Helm. However, there are a few things to consider before running a helm install…
The 4 kinds of Providers#
To run, Cluster API relies on a modular architecture made up of several components, known as Providers. Each has a clearly defined role within the ecosystem:
The Core Provider#
The Core Provider is the heart of the Cluster API system. It is responsible for:
Provides the API’s fundamental custom resource definitions (CRDs), such as
Cluster,Machine,MachineDeploymentandMachineSet;Orchestrates the overall logic and acts as a link between the various other providers;
Manages the high-level lifecycle of resources, ensuring, for example, that resources associated with a cluster are deleted in a cascading manner when the cluster is deleted.
The Control Plane Provider#
The Control Plane Provider is responsible for the operation and configuration of the Kubernetes control plane. Its tasks are as follows:
Initialises and configures the control plane components: kube-apiserver, kube-controller-manager, kube-scheduler and, in most cases, etcd;
Manages the certificates and keys required for these components to communicate securely;
Drives upgrades of the Control Planes in an orderly manner (for example, by replacing machines one by one).
The Bootstrap Provider#
The Bootstrap Provider is designed to transform a raw machine (virtual or physical) into a fully functional Kubernetes node. It is responsible for:
Generates configuration data in the format required by the target operating system (e.g. cloud-init);
Prepares the scripts needed to install the required components, such as the container engine (often containerd) and the kubelet;
Provides the initialisation (
kubeadm init) or join (kubeadm join) commands so that the machine can join the cluster once it has booted up.
The Infrastructure Provider#
The Infrastructure Provider acts as the interface with the target environment or cloud provider. It:
Communicates with the underlying API (e.g. AWS, Azure, vSphere, Proxmox);
Manages the creation, modification and deletion of raw resources such as virtual machines, networks and IP addresses;
Provides a specific implementation for Cluster API base objects (e.g.
AWSMachinefor a generic machine).
Of course, there are other types of providers, but these four are the most common and are required for Cluster API to work properly.
The next article will discuss the IPAM provider, but I won’t say any more about that for now!
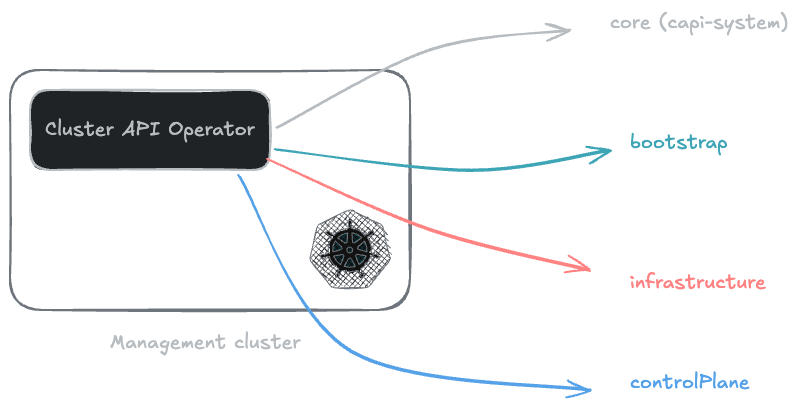
The providers that need to be defined in the Cluster API operator to make it operational
Provisioning, step by step#
In practical terms, what happens when you initiate the creation of a cluster? It all starts, as is often the case, with the command kubectl create -f cluster.yaml on the cluster Management node.
In this example, the cluster.yaml file contains all the resources needed to deploy the cluster as a whole; these will be explained in full in Part 2, so hang in there…
First, the Core Provider detects the creation of the Cluster resource. It then requests the Infrastructure Provider to prepare the necessary resources.
Next, the Control Plane Provider comes into play to instantiate the machines intended, as its name suggests, for the Control Plane. For each machine, the Bootstrap Provider generates a custom configuration script.
This script is sent to the Infrastructure Provider, which will request the creation of the virtual machine on the target platform by injecting this configuration into it.
On startup, the virtual machine runs its initialisation script, installs the required components, and registers with the first Control Plane (if one exists) as a new node. The same process is then repeated for the Workers via MachineDeployment resources.
There are two key points to remember to bring the nodes to Ready status:
- Install a network layer (CNI) to allow Pods to communicate;
- Deploy a Cloud Controller Manager to retrieve and add the
providerIDfield to the newly created node; this establishes the link with the underlying infrastructure.
Once the node is ready, CAPI continues its process and will repeat these operations as many times as necessary to reach the desired state.
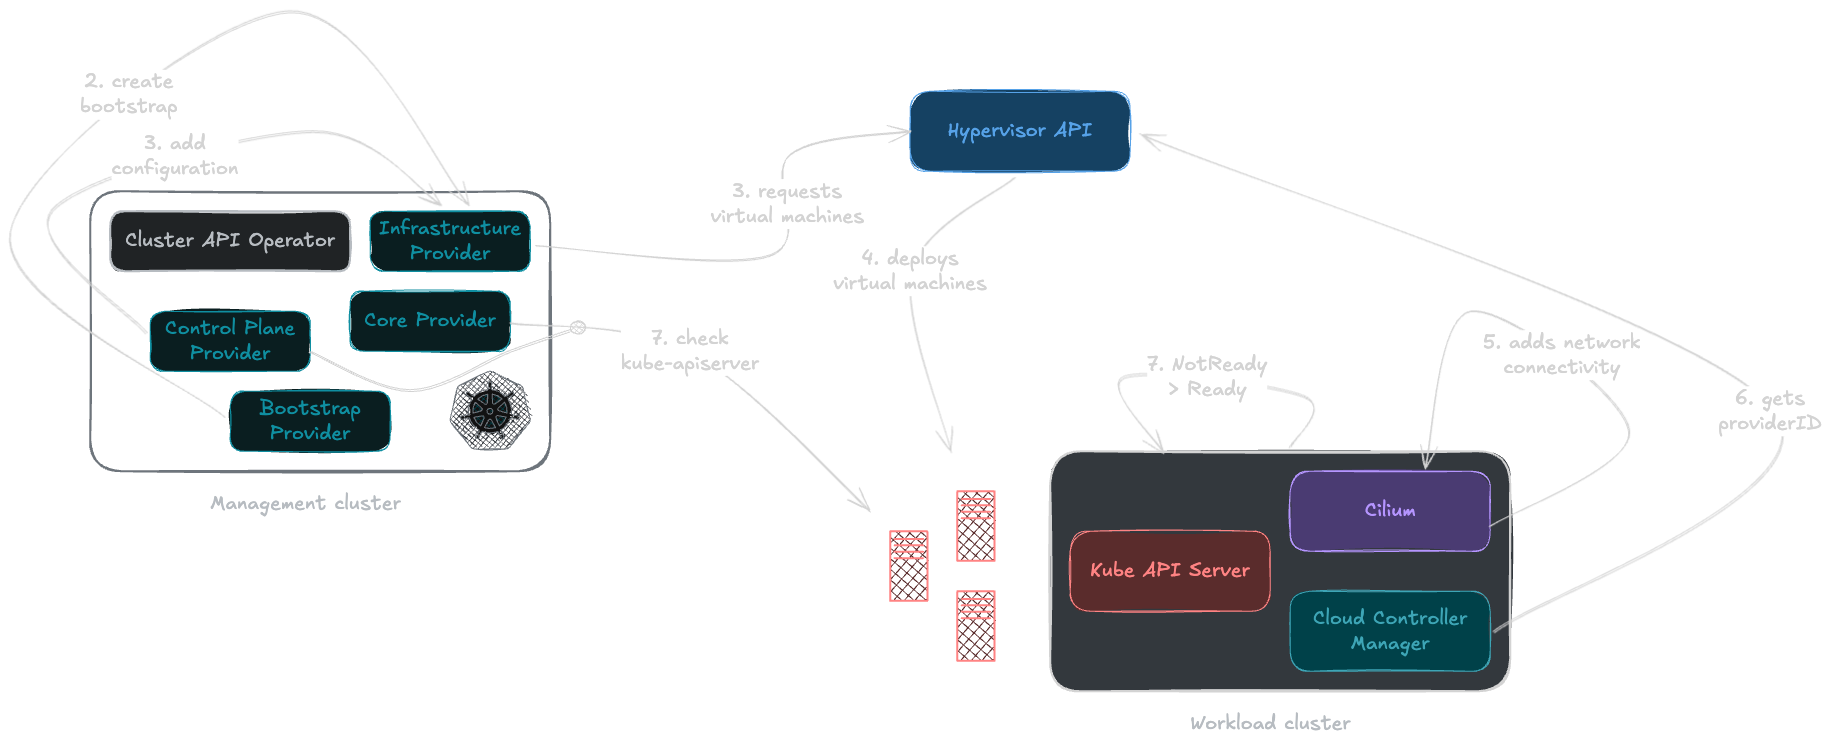
Full provisioning of a new cluster via the Management cluster
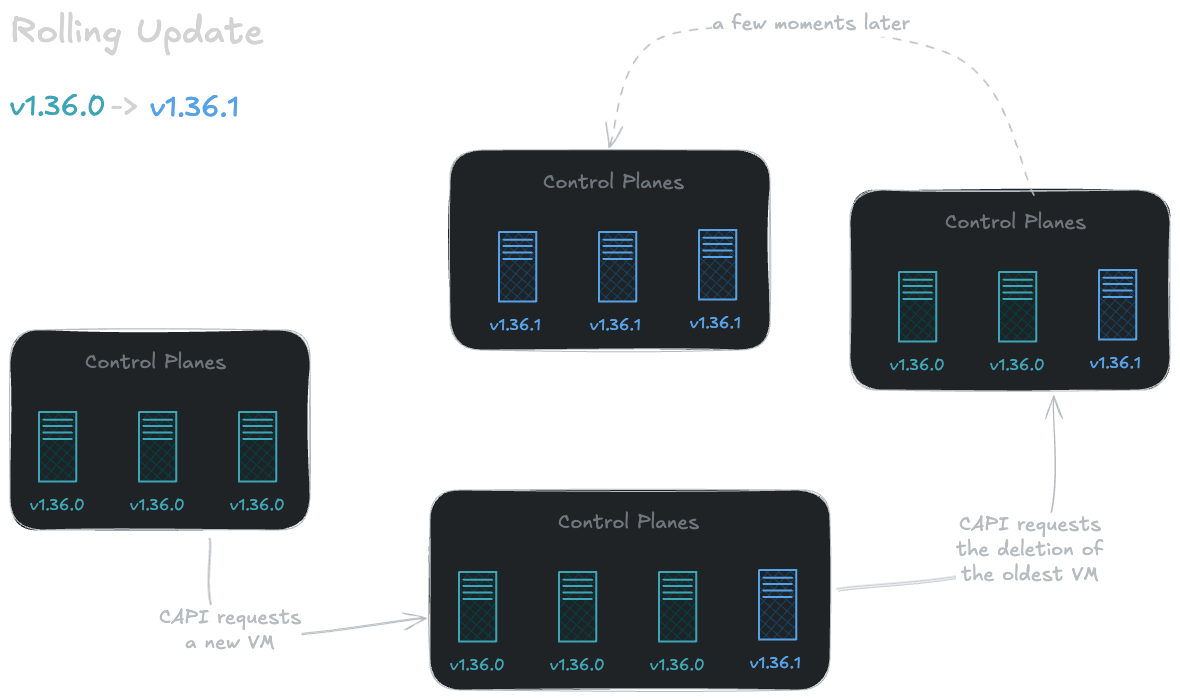
Rolling updates in action
An atmosphere of sovereignty#
The beauty of choice#
One of the main advantages of Cluster API is the freedom to choose components.
Regardless of the category and provider you choose, there is a wide range of options available to you.
If you take Infrastructure as an example, there is a solution for every preference: CAPMOX for Proxmox, CAPV for vSphere, CAPZ for Azure. This covers the most common requirements; the same applies to the Control Plane (and Bootstrap), where the most well-known Kubernetes distributions are supported: kubeadm, k3s, RKE2 and Talos.
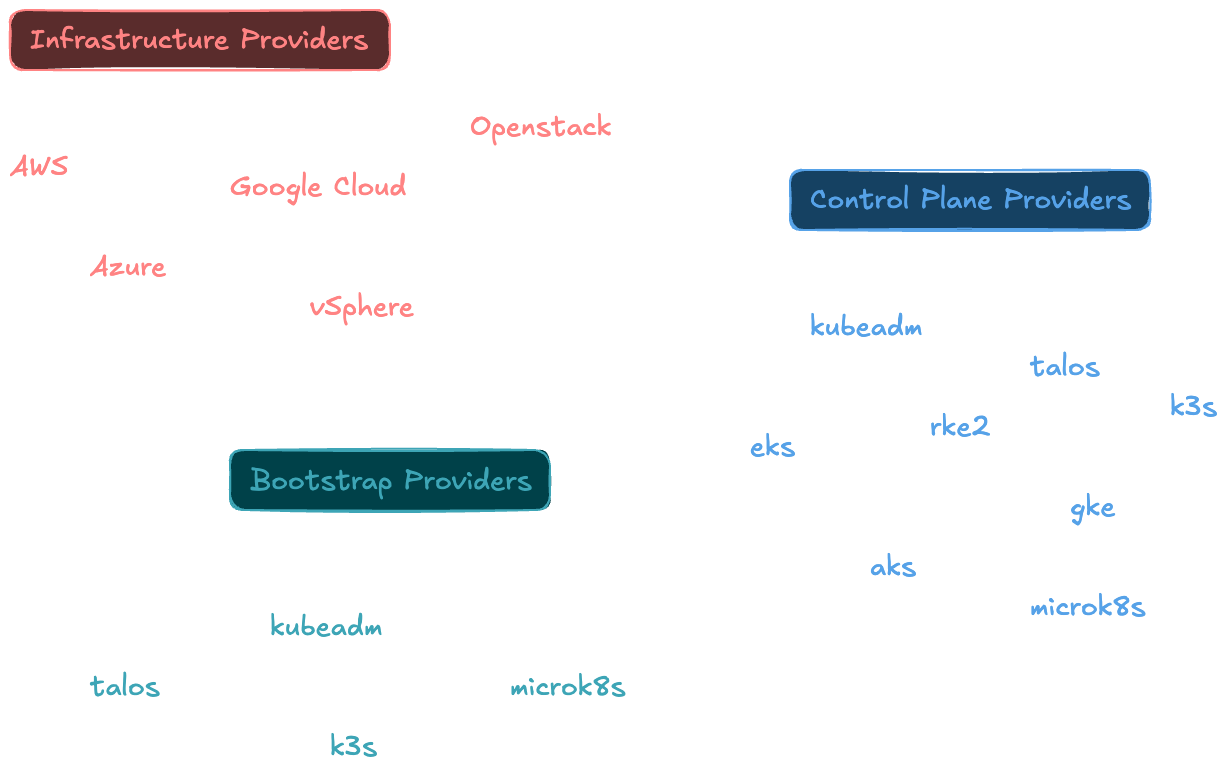
There’s something for everyone, isn’t there? (This list is not exhaustive…)
This approach allows you to build your own Kubernetes platform with a wide range of options! You can therefore migrate from one hypervisor to another or change your Kubernetes distribution simply by modifying a few APIs, without having to completely switch deployment engines.
Full control#
The second trending buzzword after AI is sovereignty. This term is often associated with the need to host data within the country where you live or work, particularly to benefit from the same regulatory requirements as the service provider or to ensure that the data never leaves the country.
For me, there are several levels to this. The first is simply to have as minimal a dependency as possible on an infrastructure provider or the system being used. Furthermore, this means being able to easily migrate from one cloud to another or from one Kubernetes distribution to another, thereby avoiding “vendor lock-in” and maintaining a degree of freedom.
As you will have gathered from the section above, Cluster API sufficiently meets these expectations.
Towards more features#
The traditional life cycle#
Historically, the default behaviour of Cluster API has been based on the rolling update strategy. This approach involves creating a new instance and then destroying the existing virtual machine to apply the requested changes.
Although functional, this method can sometimes present a few challenges:
Some workloads do not tolerate node downtime well, leading to service interruptions.
Minor changes, such as adding an SSH key or adjusting the amount of RAM, do not necessarily justify a complete replacement of a virtual machine.
In-place upgrade#
To address these limitations, a major new feature has been introduced: in-place upgrades with version v1.12. Cluster API now allows Kubernetes binaries, such as the Kubelet or Control Plane components, to be updated directly within the existing instance without destroying it.
It is entirely possible to combine in-place updates with a rolling update strategy. By adjusting the deployment strategy, you can fine-tune the desired behaviour depending on the type of change to be made to the cluster.
Chained upgrades#
Another eagerly awaited feature is chained upgrades, also available with Cluster API v1.12, allowing sequential node updates to be automated.
This makes it possible to upgrade the Control Plane from version 1.33.0 to version 1.36.0 by automatically applying all intermediate minor updates (1.33.0, 1.34.0, 1.35.0). Once the Control Plane is up to date, it is the Workers’ turn to migrate from version 1.33.0 to version 1.36.0 in one leap.
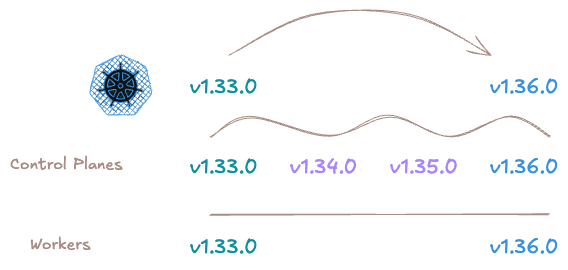
How chained upgrades work with Cluster API
Talos Linux and Cluster API: the perfect match#
The drawbacks of traditional operating systems#
When deploying Kubernetes nodes, people often use standard Linux distributions such as Ubuntu, Debian or RHEL. Although robust, these systems were not designed to be dedicated container-running systems.
Indeed, the presence of SSH, package managers and numerous system services increases the attack surface.
Furthermore, these systems are prone to configuration drift: over time, manual changes or partial updates make each node unique, defeating the immutability sought in a Kubernetes environment.
Remember, the real aim is to update machines in the same way as Pods!
The Talos Linux paradigm#
Talos Linux offers a paradigm shift. It is an immutable, minimalist operating system that is secure by default, designed solely to run Kubernetes.
It is distinguished by several key features:
- No shell or SSH access;
- No package manager;
- Read-only root filesystem;
- Configuration and management exclusively via an API and a YAML file using the
talosctlcommand; - An image builder depending on the platform or plugins to be incorporated, because it is indeed possible to add additional components such as gVisor, vmtools for VMware or the QEMU agent.
This OS is therefore your best ally as it meets a huge number of security criteria. Furthermore, its “as-code” approach makes it incredibly easy to configure…
The fit with Cluster API#
With Cluster API and Talos Linux’s “as-code” approach, operating system configuration (networking, disk mounts, kernel settings) becomes a declarative Kubernetes resource within the Cluster Management system, the TalosConfigTemplate.
This means that the infrastructure, the OS and the applications are all managed by the same reconciliation engine, in a fully unified manner.
apiVersion: bootstrap.cluster.x-k8s.io/v1alpha3
kind: TalosConfigTemplate
metadata:
  name: talos-worker
spec:
  template:
    spec:
      generateType: worker
      talosVersion: v1.13.2
      strategicPatches:
        - |
          machine:
            network:
              nameservers:
                - 10.10.1.100
                - 10.10.1.101
              interfaces:
                - deviceSelector:
                    busPath: "0*"
                  dhcp: true
            install:
              disk: /dev/sda
              extraKernelArgs:
                - net.ifnames=0
          cluster:
            controlPlane:
              endpoint: https://10.1.0.10:6443
Here is an example of network settings that need to be propagated to the Workers
A few words to conclude#
By standardising cluster lifecycle management, Cluster API offers the flexibility of a unified model with an extensive catalogue of both infrastructure and Kubernetes distributions. Whether you use Proxmox, vSphere, Azure or Google Cloud, the operational experience remains the same, significantly reducing operational complexity.
Nevertheless, one question remains: if Cluster API needs a Kubernetes cluster to create other clusters, how can this first Management cluster be created?
Of course, this question will be answered in the next chapter! It will cover the initialisation of the Management cluster, driven by Cluster API with Proxmox and Talos Linux.
See you soon!