
In the first part of this series on Cluster API, you learned about the more theoretical aspects: the reconciliation logic, the various providers, and also the benefits of managing your infrastructure in the same way you create Pods: in an immutable way.
However, one important question remains unresolved: how do you create the very first cluster, also known as a Management cluster, capable of running the Cluster API?
Bingo! That’s exactly what this second part is going to cover!
The central role of the Management cluster#
The Management cluster is not a Kubernetes cluster like any other. Its purpose is not to host business applications, nor to make production workloads available to your users. Its sole purpose is to manage the lifecycle of other Kubernetes clusters, known as Workload clusters.
From a slightly more technical perspective, it is this component that will contain all the reconciliation logic required to interact with the Providers mentioned in Part 1: the Core Provider, the Control Plane Provider, the Bootstrap Provider and the Infrastructure Provider. It is these providers that transform a simple YAML file into operational virtual machines, all while querying your target platform and generating the configuration required to start up each node.
The entire mechanism is based on the well-known Custom Resource Definitions (CRDs). A Cluster object, a Machine or a MachineDeployment object are simply declarations of the desired state, stored within Kubernetes and, therefore, within the Management cluster. Each Provider continuously monitors these objects via its own reconciliation loop: it compares the desired state with the current state of the infrastructure, and acts accordingly to reduce the gap between the two. This follows exactly the same principle as for a standard Deployment, except that the object being reconciled is no longer a Pod but a virtual machine configuration.
This is precisely where the fundamental difference lies compared to a Workload cluster. In a Workload cluster, you use standard Kubernetes resources (Deployment, Service, Ingress) to run your applications. In the Management cluster, you use specific resources provided by the Cluster API to make other Kubernetes clusters operational. The first allows you to use services, while the second serves your platform.
The chicken-and-egg paradox#
“Cluster API requires a Kubernetes cluster to create and manage other Kubernetes clusters”
Do you find that odd? I must confess that I did too the first time…
In other words, as everything is done in Kubernetes, it is essential to have a Kubernetes cluster already up and running, particularly in order to install the Cluster API operator.
Still, this paradox raises an interesting question: how do you build that very first cluster? Indeed, given the critical nature of the management cluster’s role, it is vital to have solid, maintainable foundations, avoiding the pitfall of relying on manual set-ups.
The aim is clearly to establish a reliable and reproducible approach that will enable us to deploy this very first building block, before delegating the rest of the operations to it.
A few ideas for moving forward#
In my opinion, there are two main approaches to resolving this initialisation issue.
The first approach involves using tried-and-tested, highly reputable deployment tools, such as Kubespray or, why not, Kubeadm, with the aim of deploying this Management cluster. The advantage lies in efficiency: the resulting cluster is up and running quickly. However, there is one major drawback: it introduces a break with the approach described so far. This Management cluster, unlike the workload clusters it will manage, will not itself be managed by Cluster API. You will therefore need to maintain two different approaches to managing the lifecycle of your clusters, depending on whether it is the Management cluster or the clusters it oversees. That’s a lot of complexity for very little gain…
The second approach involves creating a temporary cluster, usually using a solution such as Kind, to set up the infrastructure. The Cluster API operator is temporarily installed there along with all the necessary Providers; the future target Management cluster is then declared from this ephemeral cluster, and all Cluster API resources are migrated to the target cluster once it is up and running. This migration operation has a specific name within the CAPI ecosystem: the pivot, notably using the clusterctl move command, introduced later on.
I would definitely recommend option 2, for one quite simple reason: it allows maintaining an end-to-end approach with Cluster API. The Management cluster is itself created and will be managed by Cluster API, just like any Workload cluster. This means a single, consistent approach is retained for the entire Kubernetes fleet, while avoiding the need to maintain two separate procedures for two different cluster roles.
The moment of truth: a step-by-step guide#
It’s time to get your hands dirty!
Before getting to the heart of the matter, here’s a quick reminder of the technical prerequisites, already mentioned at the end of Part 1. For virtualisation, I’ll be using Proxmox, and for the operating system and Kubernetes distribution, Talos Linux, for the reasons of security and immutability mentioned earlier.
The Providers#
For this set-up to work, these providers need to be put together like a jigsaw puzzle. Each one has a specific role, and none of them is really optional:
CAPMOX, the Infrastructure Provider that interfaces directly with the Proxmox VE API. It is CAPMOX that translates the
ProxmoxClusterandProxmoxMachineTemplateobjects into concrete calls: creating virtual machines, injecting the Talos configuration, assigning VM IDs, and managing placement on Proxmox nodes;CABPT, the Talos Bootstrap Provider. Whereas a standard Bootstrap Provider typically generates
cloud-initfor a traditional Linux distribution, CABPT generates a machine configuration in Talos Linux’s native format. It also produces the cluster’s shared secrets (CA, talosconfig) required for authentication with the Talos API once the nodes have booted;CACPPT, the Talos Control Plane Provider. It relies on CABPT to specifically manage the Control Plane lifecycle, i.e.
kube-apiserver,etcdandkube-controller-manager, by orchestrating operations directly via the Talos gRPC API rather than via SSH or initialisation scripts. It is this Provider that exposes theTalosControlPlaneresource used in manifests.Cluster API IPAM Provider In Cluster, required by CAPMOX to assign static IP addresses to virtual machines from a pool defined within the cluster itself, without relying on an external DHCP server. This is an implicit but critical prerequisite: without this Provider active, CAPMOX is simply unable to complete the network configuration of the virtual machines it provisions.
Enough theory for now, it’s time to start the roll-out!
Before beginning…#
All the commands and YAML files can be found in this GitHub repository, please feel free to take a look:
Here is a list of the tools required during this process:
- A Proxmox VE server with administrative privileges;
- Kind for the ephemeral cluster;
- A containerisation engine such as Docker or Podman;
- The
clusterctlbinary for operations related to Cluster API, in particular to run a few commands to check the health of the deployed clusters.
Furthermore, two preliminary steps are required on the Proxmox side, before you even touch Cluster API:
- A virtual machine template with the target version of Talos Linux. To save time, I’ve provided you with a ready-to-use script to run in the Proxmox shell;
The concept is to download an image from the Talos Linux Image Factory website, selecting the Nocloud format, to create a ready-to-use template that will be used to set up a virtual machine.
In addition to the base version 1.13.7, I have added the qemu-guest-agent extension to provide the connector to the hypervisor.
- A service account for Cluster API with a set of roles to enable it to perform its tasks.
Here are the commands you need to run in the Proxmox shell to set this up:
pveum user add capi@pve --comment "Cluster API Service Account"
pveum acl modify / --user capi@pve --role PVEVMAdmin
pveum acl modify / --user capi@pve --role PVEDatastoreAdmin
pveum acl modify / --user capi@pve --role PVEAuditor
pveum acl modify / --user capi@pve --role PVESDNAdmin
pveum user token add capi@pve capi-token --privsep 0
The ID and token generated by the last command must then be stored in environment variables; speaking of that, here are a few that need to be set:
export PROXMOX_URL=      # https://...
export PROXMOX_TOKEN_ID= # xxx@yyy!zzz
export PROXMOX_TOKEN_SECRET=
All set? Let’s go!
The ephemeral cluster#
You can now create the ephemeral cluster using kind, which will temporarily host the Cluster API controllers whilst the actual cluster is being deployed:
kind create cluster --name ephemeral-cluster
kubectl cluster-info
To use clusterctl safely, it is recommended that you create the file ~/.cluster-api/clusterctl.yaml to define the Providers and their versions:
providers:
  # https://github.com/ionos-cloud/cluster-api-provider-proxmox/releases
  - name: "proxmox"
    type: "InfrastructureProvider"
    url: "https://github.com/ionos-cloud/cluster-api-provider-proxmox/releases/v0.9.0/infrastructure-components.yaml"
  # https://github.com/siderolabs/cluster-api-bootstrap-provider-talos/releases/
  - name: "talos"
    type: "BootstrapProvider"
    url: "https://github.com/siderolabs/cluster-api-bootstrap-provider-talos/releases/v0.6.12/bootstrap-components.yaml"
  # https://github.com/siderolabs/cluster-api-control-plane-provider-talos/releases/
  - name: "talos"
    type: "ControlPlaneProvider"
    url: "https://github.com/siderolabs/cluster-api-control-plane-provider-talos/releases/v0.5.13/control-plane-components.yaml"
  # https://github.com/kubernetes-sigs/cluster-api-ipam-provider-in-cluster/releases
  - name: "in-cluster"
    type: "IPAMProvider"
    url: "https://github.com/kubernetes-sigs/cluster-api-ipam-provider-in-cluster/releases/v1.1.0/ipam-components.yaml"
You then initialise the Cluster API and the entire stack of providers shown above:
clusterctl init \
  --core cluster-api \
  --infrastructure proxmox \
  --bootstrap talos \
  --control-plane talos \
  --ipam in-cluster
Check that everything is working properly:
kubectl get pods -A | grep -E "capi|capmox|cabpt|cacppt"Each namespace must contain a Pod, indicating that all the controllers have been deployed correctly! Like this:
cabpt-system                  cabpt-controller-manager-cfbb65994-zqggz                   1/1     Running   0          98s
cacppt-system                 cacppt-controller-manager-9df6b5b8d-mq9hr                  1/1     Running   0          98s
capi-ipam-in-cluster-system   capi-ipam-in-cluster-controller-manager-85d66d4bff-xl59h   1/1     Running   0          98s
capi-system                   capi-controller-manager-6bc7467f69-zg6r7                   1/1     Running   0          99s
capmox-system                 capmox-controller-manager-6f764849cc-mhprx                 1/1     Running   0          98s
You can then create a dedicated namespace, KMGT (yes, I’m not very imaginative), containing all the resources related to the future Management cluster. The idea is to have one cluster per namespace to make it easier to allocate resources:
kubectl create namespace kmgtCAPMOX needs to know the Proxmox credentials in order to provision the virtual machines. These are stored in a Secret, located in the capmox-system namespace.
cat <<EOF | kubectl apply -f -
apiVersion: v1
kind: Secret
metadata:
  name: proxmox-credentials
  namespace: capmox-system
  labels:
    platform.ionos.com/secret-type: "proxmox-credentials"
stringData:
  url: ${PROXMOX_URL}
  token: ${PROXMOX_TOKEN_ID}
  secret: ${PROXMOX_TOKEN_SECRET}
EOF
Please make sure you don’t forget the label platform.ionos.com/secret-type: "proxmox-credentials", allowing CAPMOX to retrieve the secret.
STOP! Before creating the resources for the Management cluster, it’s time to understand how it all fits together.
Here is a diagram showing the resources required and their dependencies:
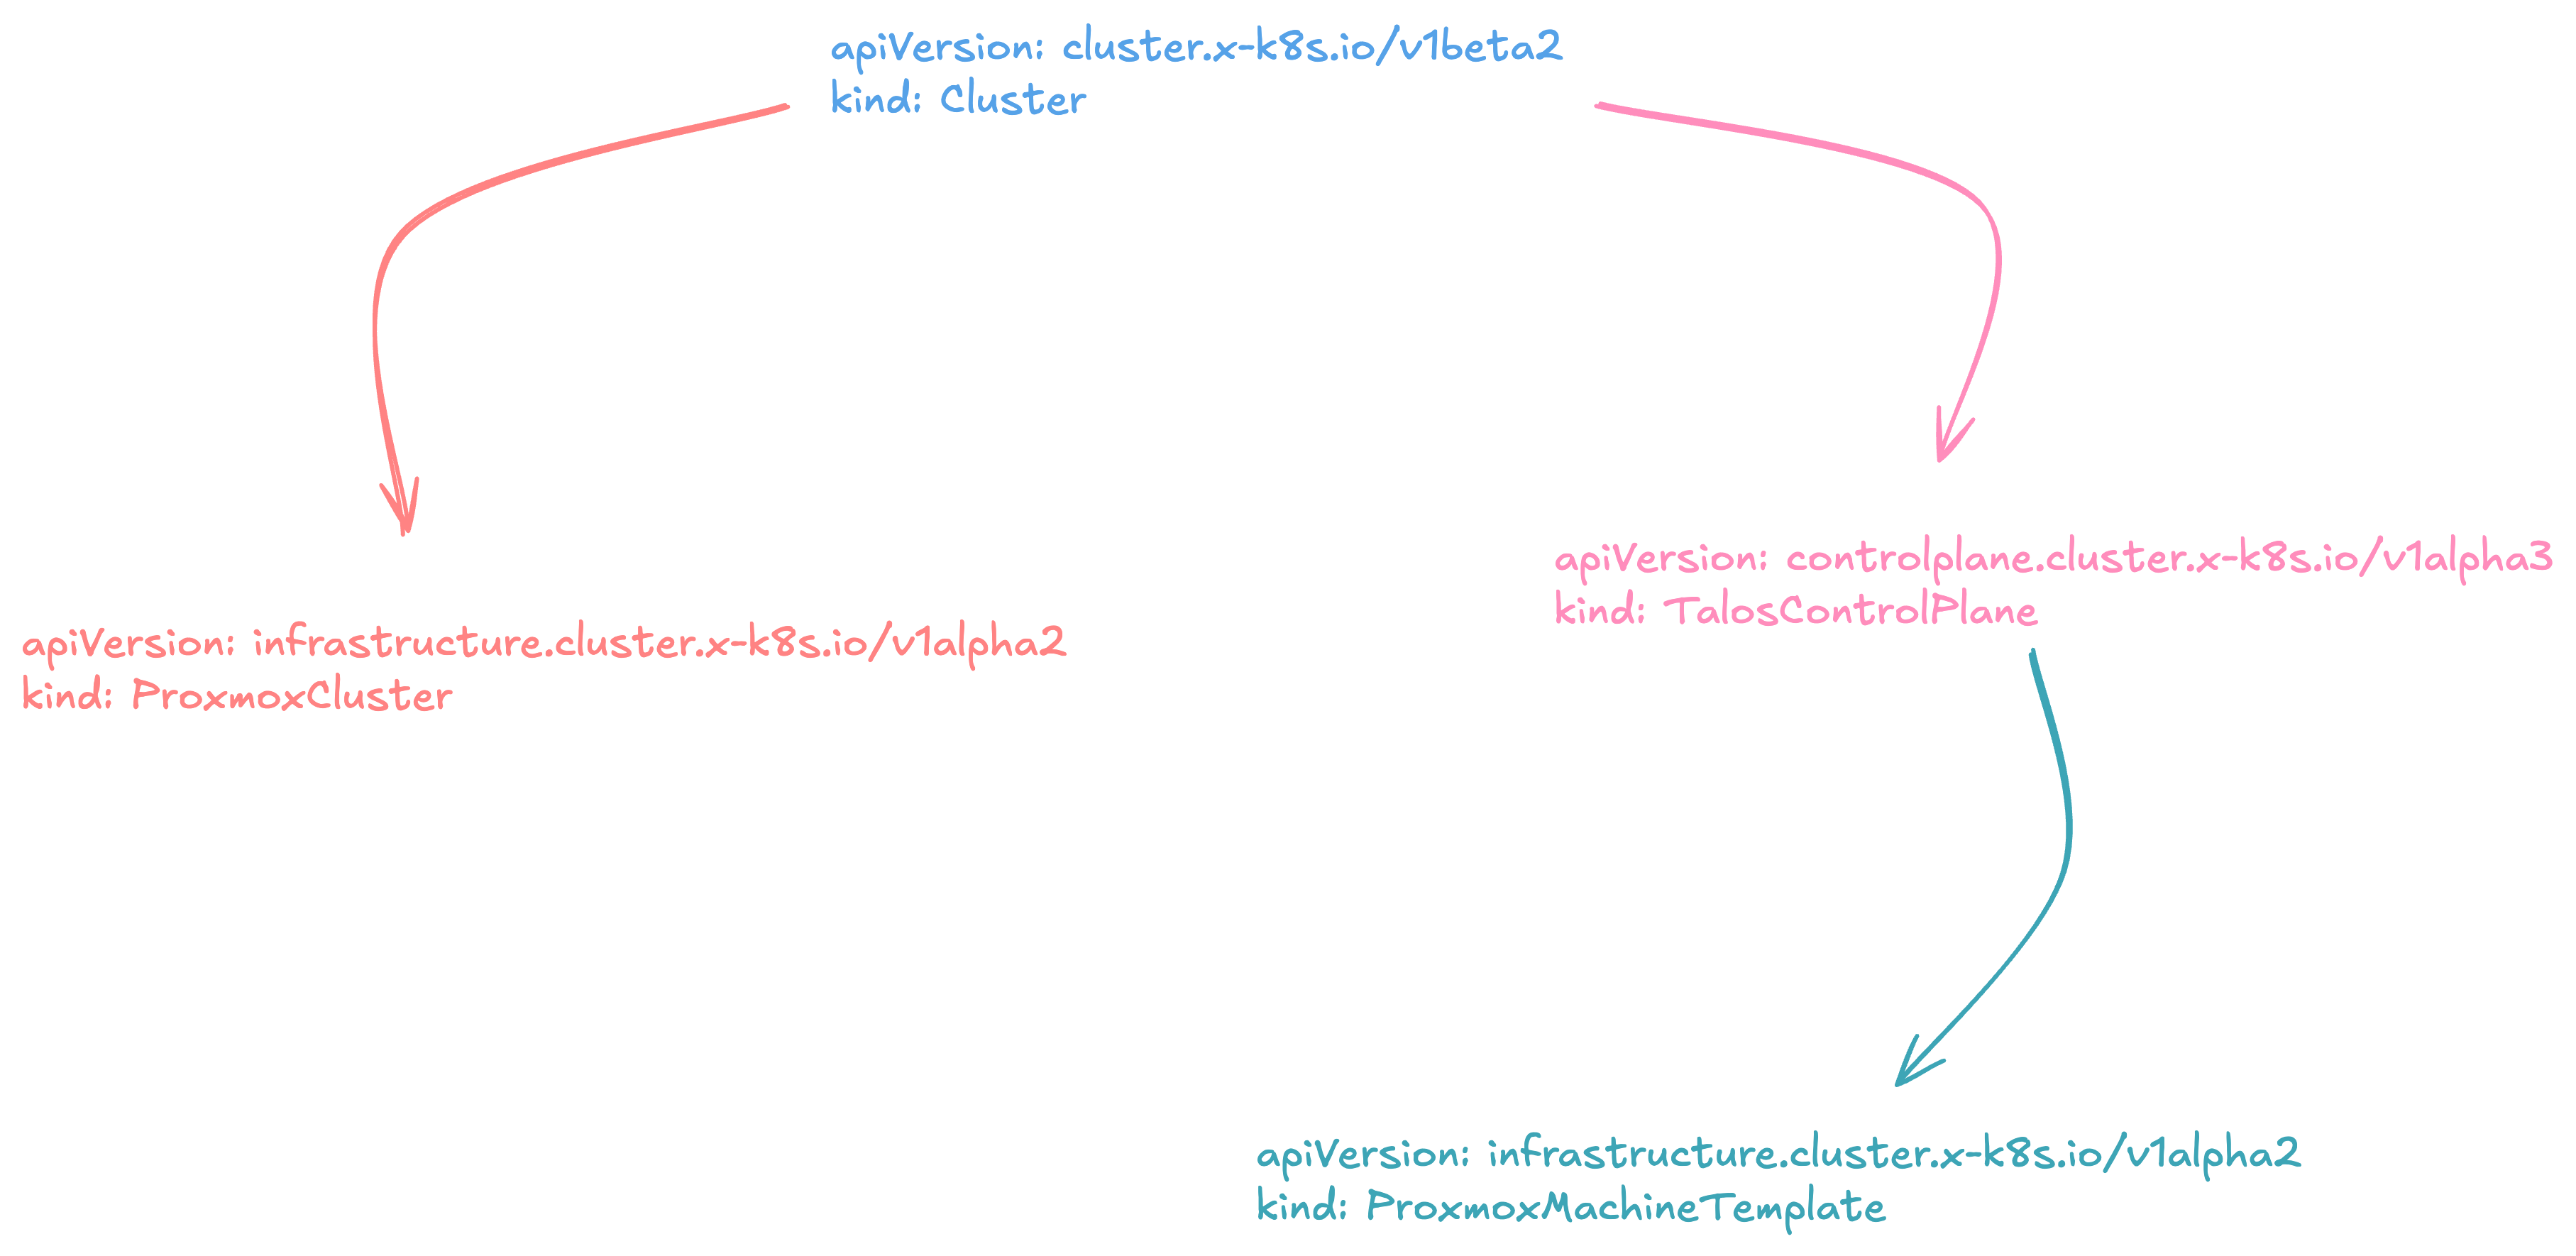
The Cluster contains the Kubernetes configuration; it is used to define the network ranges for Pods and Services. This generic resource also allows you to specify what will be used to create the infrastructure (ProxmoxCluster) as well as the type of Control Plane (TalosControlPlane);
The
ProxmoxClustercontains the physical network settings; there are certainly aspects that will need to be adjusted to suit your infrastructure. Take the time to check theipv4ConfiganddnsServersfields to ensure you are using routable ranges that are appropriate for your infrastructure. Setting theschedulerHints.memoryAdjustmentfield to 0 allows you to exceed the memory allocation of your Proxmox hypervisor, useful when setting up a lab of this kind. Finally,controlPlaneEndpointis what Cluster API will use to connect to your cluster and check that it is correctly deployed; this corresponds to the Talos Linux VIP described below;The
TalosControlPlanespecifies the Kubernetesversionto be used, as well as the number of replicas. It attaches aProxmoxMachineTemplateto define the virtual machine’s specifications. Finally, thecontrolPlaneConfigprovides the ability to override the default Talos Linux configuration by adding various types of specifications:
machine:
  install:
    disk: /dev/sda # Installs the OS on the first drive
    extraKernelArgs:
      - net.ifnames=0 # Prevents interfaces from being renamed
  network:
    interfaces:
      - deviceSelector:
          busPath: "0*" # Selects the first valid interface to disable DHCP
        dhcp: false
        vip: # VIP is a key component of Talos Linux; it ensures high availability by switching between machines
          ip: 192.168.1.150
  kubelet:
    extraArgs:
      cloud-provider: external         # Allows you to install a Cloud Controller Manager afterwards
      rotate-server-certificates: true # Enables certificate rotation using Cloud Controller Manager
  features:
    kubernetesTalosAPIAccess: # Useful for the Cloud Controller Manager; this will be explained a little later
      enabled: true
      allowedRoles:
        - os:reader
      allowedKubernetesNamespaces:
        - kube-system
cluster:
  network:
    cni:
      name: none # Disables the installation of the network layer so that one can be installed correctly using Helm
  proxy:
    disabled: true # Necessary for Cilium without kube-proxy
  allowSchedulingOnControlPlanes: true # Enables Pods to be deployed on the Control Plane
  externalCloudProvider:
    enabled: true # Allows you to install a Cloud Controller Manager afterwards
That’s quite a lot… To find out more about the VIP, please have a look at the official documentation.
- Last but not least, the
ProxmoxMachineTemplate, dedicated to Control Planes in this case, allows you to define a number of characteristics for the virtual machine: CPU, memory, network, disk space, but above all the template with thetemplateIDthat was created using the script. Other points require special attention:
checks:
  skipCloudInitStatus: true # Disables the use of Cloud Init, which is not required for Talos Linux
  skipQemuGuestAgent: false # Allows you to wait for the QEMU agent to verify that the virtual machine is functioning correctly
metadataSettings:
  providerIDInjection: true # Inserts the providerID into the virtual machine’s metadata
Is that clear? All that remains is to set up this set of resources:
kubectl -n kmgt create -f ./clusters/kmgt/config.yamlThe CAPMOX, CABPT and CACPPT providers then take over to provision the virtual machines and generate the necessary Talos configuration.
You can monitor the creation of each resource using the dedicated commands. Although I do have a slight preference for the one using clusterctl, as it provides a summary view!
kubectl -n kmgt get cluster
kubectl -n kmgt get machines
kubectl -n kmgt get proxmoxmachines
kubectl -n kmgt get taloscontrolplanes

clusterctl -n kmgt describe cluster kmgt
Once the machines are in the Ready state, retrieve both the kubeconfig for the new cluster and its talosconfig; the second one enables direct communication with the Talos API on each node.
cd clusters/kmgt
kubectl -n kmgt get secrets kmgt-kubeconfig -o=jsonpath='{.data.value}' | base64 -d > ./kubeconfig.yaml
kubectl -n kmgt get secrets kmgt-talosconfig -o=jsonpath='{.data.talosconfig}' | base64 -d > ./talosconfig.yaml
cd -

export KUBECONFIG=./clusters/kmgt/kubeconfig.yaml
A few minutes later… A wild node appears!
kubectl get nodesNAME STATUS ROLES AGE VERSION
kmgtcp-l8vsk NotReady control-plane 3s v1.36.2NotReady??? But why?
At this stage, the cluster exists, but it still lacks the network of Pods and integration with Proxmox. Therefore, Cilium needs to be installed as the CNI, along with Talos’s Cloud Controller Manager, responsible for synchronising Proxmox metadata—in particular the well-known providerID essential for finalising the Cluster API process.
This is the log you should see when you run clusterctl -n kmgt describe cluster kmgt from the ephemeral cluster:
NodeHealthy: Waiting for a Node with spec.providerID
proxmox://xxx-xxx-xxx to exist
Right, let’s go:
helm install \
  cilium \
  oci://quay.io/cilium/charts/cilium \
  --version 1.19.6 \
  --namespace kube-system \
  --values ./clusters/kmgt/charts/cilium.yaml \
  --wait

helm install \
  talos-cloud-controller-manager \
  oci://ghcr.io/siderolabs/charts/talos-cloud-controller-manager \
  --version 0.5.5 \
  --namespace kube-system \
  --values ./clusters/kmgt/charts/cloud-controller-manager.yaml \
  --wait
The values files for the charts specify the requirements for Cilium to run on Talos Linux. As for the talos-cloud-controller-manager, only two controllers are enabled: cloud-node for metadata and node-csr-approval for certificate renewal.
In fact, it is this component that requires this configuration snippet in TalosControlPlane:
features:
  kubernetesTalosAPIAccess:
    enabled: true
    allowedRoles:
      - os:reader
    allowedKubernetesNamespaces:
      - kube-system
Without this, there is no service account with sufficient permissions to read the cluster’s resources.
A final kubectl get nodes command confirms that the node has indeed changed to the Ready state.
kubectl get nodesNAME STATUS ROLES AGE VERSION
kmgtcp-l8vsk Ready control-plane 12m v1.36.2Not bad, is it?
Set up the Management cluster#
The Management cluster exists, but it is empty. Rather than running a standard clusterctl init, this time the Cluster API Operator will be used, offering a declarative way to configure Providers using Helm. This provides a history in case of trouble and makes it easy to roll back changes!
Cert Manager is a prerequisite for the operator, so let’s start by installing it:
helm install cert-manager oci://quay.io/jetstack/charts/cert-manager \
  --namespace cert-manager \
  --create-namespace \
  --version v1.21.0 \
  --set crds.enabled=true \
  --wait
Next, install the Cluster API Operator itself:
helm repo add cluster-api-operator https://kubernetes-sigs.github.io/cluster-api-operator
helm repo update

helm install \
  cluster-api-operator \
  cluster-api-operator/cluster-api-operator \
  --version 0.28.0 \
  --namespace capi-operator-system \
  --create-namespace \
  --values ./clusters/kmgt/charts/cluster-api-operator.yaml \
  --wait
As expected, the Providers are the same, but this time in a different format within the clusters/kmgt/charts/cluster-api-operator.yaml file:
infrastructure:
  proxmox:
    namespace: capmox-system
    createNamespace: true
    version: v0.9.0
    configSecret:
      name: proxmox-credentials
    fetchConfig:
      url: https://github.com/ionos-cloud/cluster-api-provider-proxmox/releases/v0.8.1/infrastructure-components.yaml

bootstrap:
  talos:
    namespace: cabpt-system
    createNamespace: true
    version: v0.6.12
    fetchConfig:
      url: https://github.com/siderolabs/cluster-api-bootstrap-provider-talos/releases/v0.6.11/bootstrap-components.yaml
[...]
As with the ephemeral cluster, CAPMOX requires Proxmox credentials to run. Therefore, you need to recreate the same Secret as before, this time in the capmox-system namespace of the Management cluster.
cat <<EOF | kubectl apply -f -
apiVersion: v1
kind: Secret
metadata:
  name: proxmox-credentials
  namespace: capmox-system
  labels:
    platform.ionos.com/secret-type: "proxmox-credentials"
stringData:
  url: ${PROXMOX_URL}
  token: ${PROXMOX_TOKEN_ID}
  secret: ${PROXMOX_TOKEN_SECRET}
EOF
Finally, confirm that all the Pods in the Cluster API namespaces have started successfully on this cluster:
kubectl get pods -A | grep -E "capi|capmox|cabpt|cacppt"The Management cluster is ready to use – now’s the time to switch over!
The pivot#
The part to focus on here involves migrating Kubernetes resources from the ephemeral cluster; this is known as the pivot.
First, the kmgt namespace is recreated on the target cluster, exactly as it was on the ephemeral cluster:
kubectl create namespace kmgtThe migration here takes place in two stages, via a temporary directory, rather than using a single clusterctl move command directly between the two clusters. Why? Because, unfortunately, the way the clusterctl init command and the Cluster API operator handle Providers is completely different; this is a known limitation.
Start by getting back to the context of the ephemeral cluster to export the resources from the kmgt namespace to a temporary directory:
unset KUBECONFIG
mkdir tmp
clusterctl move --namespace kmgt --to-directory tmp/
Then switch to the Management cluster to re-import these same resources:
export KUBECONFIG=./clusters/kmgt/kubeconfig.yaml
clusterctl move --namespace kmgt --from-directory tmp/
Now is the time to check that everything has been migrated correctly:
kubectl -n kmgt get cluster
kubectl -n kmgt get machines
kubectl -n kmgt get proxmoxmachines
kubectl -n kmgt get taloscontrolplanes
The same applies to the clusterctl command:
clusterctl -n kmgt describe cluster kmgtNAME REPLICAS AVAILABLE READY UP TO DATE STATUS REASON SINCE MESSAGE
Cluster/kmgt 1/1 1 True Available 52s
├─ClusterInfrastructure - ProxmoxCluster/kmgt True InfoReported 55s
└─ControlPlane - TalosControlPlane/kmgtcp 1/1 1 True NoReasonReported 54s
└─Machine/kmgtcp-l8vsk 1 1 1 0 True Ready 53sEverything’s perfect!
The final step is to sever all ties with the temporary cluster once and for all:
kind delete cluster --name ephemeral-clusterAnd that’s how you create a lovely, neat Management cluster.
Day 2 Operations and Lifecycle Management#
The Management cluster is up and running! The remaining issue is its lifecycle and maintenance. There are, in fact, two distinct tasks: updating the Talos Linux component on the virtual machine image side, and updating Kubernetes.
The simplest task is upgrading Kubernetes; all you need to do is replace the version in the dedicated YAML file:
apiVersion: controlplane.cluster.x-k8s.io/v1alpha3
kind: TalosControlPlane
metadata:
  name: kmgtcp
  namespace: kmgt
spec:
  version: v1.36.2 # This is where you will go to trigger the update
[...]
However, for Talos Linux, this requires creating a new MachineTemplate with the new template ID, including the target version, as the template is immutable:
apiVersion: infrastructure.cluster.x-k8s.io/v1alpha2
kind: ProxmoxMachineTemplate
metadata:
  name: kmgtcp-XXX # Unique name for the template
  namespace: kmgt
spec:
  template:
    spec:
      templateID: XXX # Target template ID in Proxmox
[...]
And don’t forget to change the reference in the TalosControlPlane:
apiVersion: controlplane.cluster.x-k8s.io/v1alpha3
kind: TalosControlPlane
metadata:
  name: kmgtcp
  namespace: kmgt
spec:
  [...]
  infrastructureTemplate:
    apiVersion: infrastructure.cluster.x-k8s.io/v1alpha2
    kind: ProxmoxMachineTemplate
    name: kmgtcp-XXX # Reference to be updated during updates
    namespace: kmgt
As regards the Management cluster, there are two strategies available to you:
The first is self-update: the Management cluster updates itself, applying the same rolling update principles as for any Workload cluster it manages. This is consistent with the Cluster API philosophy mentioned above, but it requires particular vigilance as the controllers of the operator managing the operation run on the same infrastructure they are in the process of upgrading. The Cluster API operator must be configured in high-availability mode, and the Management cluster itself must have a sufficient number of nodes (3 or even 5) to ensure its resilience, so that Cluster API components can be failed over during the update.
The second is a Blue/Green approach: a new, up-to-date Management cluster is provisioned alongside the old one, then a new pivot is carried out to transfer all Cluster API resources to this new cluster, before decommissioning the old one. This approach reduces the risk arising from a typo in the Management cluster configuration, at the cost of additional operational complexity and a temporarily duplicated infrastructure.
It is clearly up to you to choose the path you wish to take to maintain it.
To minimise the risk of losing a cluster following an update, do not forget to enable backups, particularly in Proxmox or in your chosen hypervisor.
In addition, if you wish to extract data from etcd prior to this critical operation, Siderolabs provides talos-backup to back up data to a remote S3 bucket while allowing you to encrypt the data with an age key. Essential in production environments!
One final point to bear in mind: updates to the Cluster API operator and all Providers also follow their own cycle, independent of that of the clusters they manage. Whether using the official chart or the clusterctl upgrade command, it is strongly recommended that you consult the release notes for each Provider before upgrading, as certain changes may require adjustments to your existing YAML files.
So what next? It’s time for Workload clusters!#
At this stage, the foundations have been laid. A management cluster is now in place, entirely controlled by Cluster API, created using a fully reproducible process thanks to the pivot mechanism, and whose lifecycle can be managed entirely without the need for any other solutions or tools.
All that remains is the most practical part: deploying and managing Workload clusters, responsible for hosting your applications.
This will be the focus of the third part of this series, where Cluster API will be integrated with Argo CD to automate the end-to-end deployment of these so-called Workload clusters, using a fully GitOps approach.