
The final stage in this series on Cluster API: the Workload cluster.
In Part 2 of this series, the first foundation stone was laid: a Management cluster, created by Cluster API, along with all the defined Providers, with its configuration migrated using the pivot mechanism. As a reminder, this Management cluster acts as the orchestra conductor, deploying Kubernetes clusters according to specific use cases.
There’s just one small problem: an orchestra conductor without musicians won’t be able to perform the show of the century! This is where the Workload clusters come in; they are the ones that will actually run your applications.
It’s time for an overview#
As mentioned, the Management cluster is fully operational and ready to create these so-called Workload clusters.
The difference between the two types of clusters has already been discussed in previous sections, but it is worth mentioning again very briefly, as it is such a central aspect of the Cluster API philosophy.
The Management cluster does not run any business workloads; its sole function is to manage the lifecycle of the other clusters. The Workload cluster, on the other hand, is the opposite: it does not manage the infrastructure; it is there to run your Deployments, your Services – in short, your favourite applications.
In practical terms, when you create resources for a Workload cluster, the Management cluster follows exactly the same process as that seen when it was created. The Core Provider detects the Cluster object and the underlying resources, calls upon CAPMOX to communicate with the Proxmox API and deploy the virtual machines, while CABPT and CACPPT generate the Talos configuration and manage the Control Plane. The only difference is that the term “pivot” is no longer used here, as the Workload cluster is not intended to host the Cluster API controllers itself; it remains under the control of the Management cluster throughout its entire lifecycle.
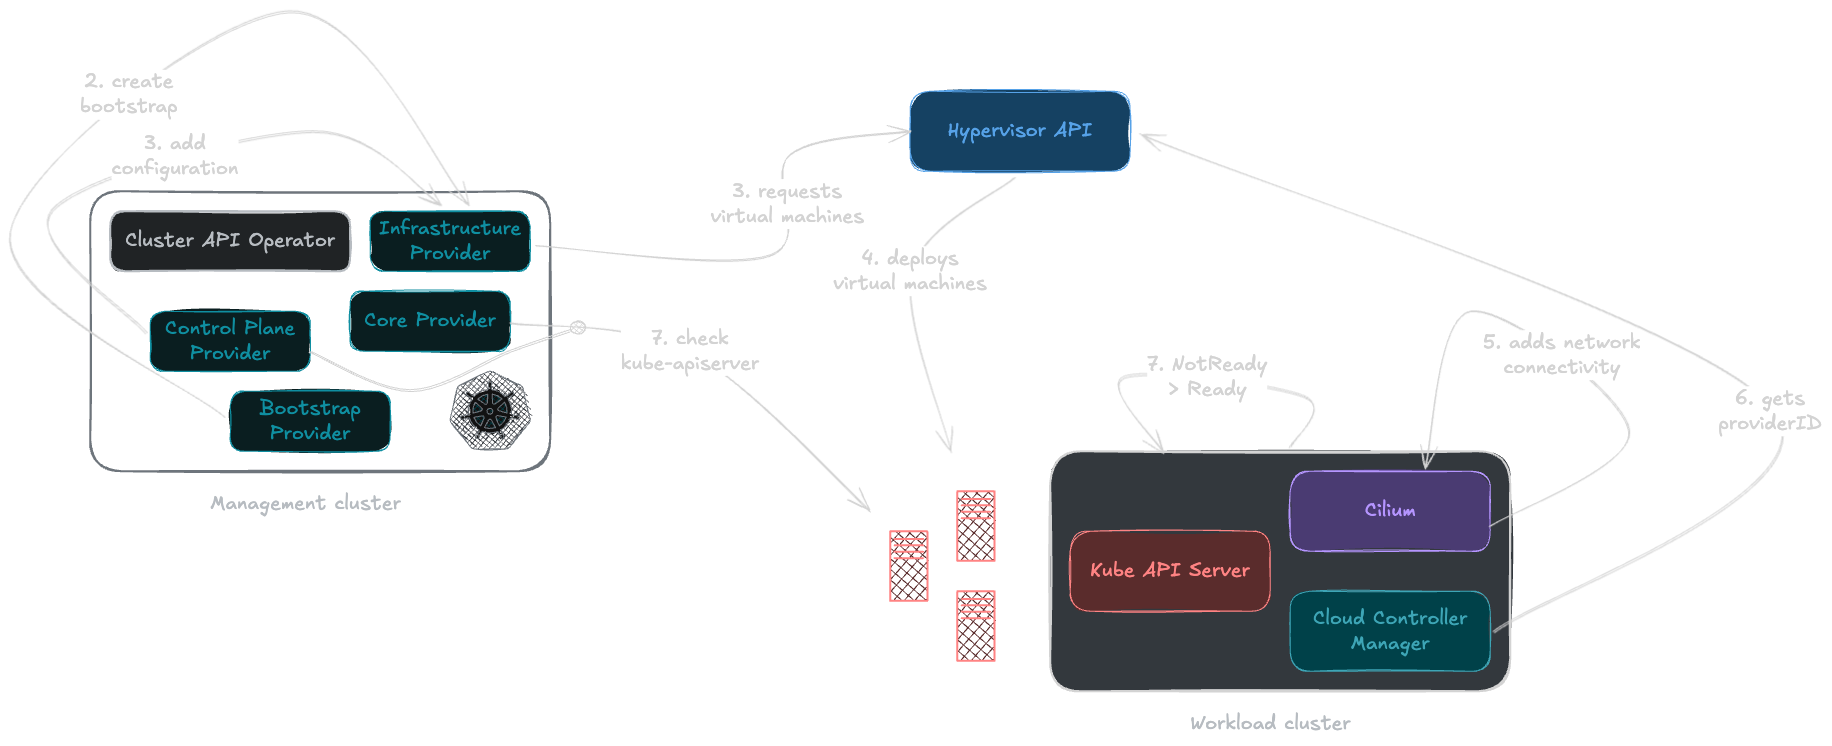
The focus is now on deploying the right-hand side – the Workload cluster, fully managed by the Management cluster
GitOps? Did you say GitOps?#
Creating a Kubernetes cluster manually using kubectl create -f was covered in Part 2, and it’s still a valid approach during the bootstrap phase or for an initial cluster, but as soon as you need to manage a fleet of clusters, multiple teams or multiple environments, this approach quickly reveals its limitations.
This leads back to one of the founding principles of everything discussed so far: describing the desired state and letting a reconciliation layer bring the current state into alignment with it.
As you’ll have realised, Cluster API’s declarative approach to resources fits naturally with GitOps, where the entire infrastructure of future clusters can be defined in a Git repository and managed using a tool such as Argo CD!
The first step is to enhance the Management cluster to turn it into a proper control centre…
Expanding the Management cluster#
Argo CD is clearly a personal choice; its wide range of custom resources (CRDs) allows you to automate the creation and deployment of clusters via an interface that is constantly evolving. If you prefer Flux CD or another tool of this sort, that’s entirely up to you.
As usual, I’ve added the YAML files for this section to the GitHub repository:
Next, for Argo CD on the Management cluster, I suggest using the official Helm chart:
helm install \
  argocd \
  oci://ghcr.io/argoproj/argo-helm/argo-cd \
  --version 10.3.3 \
  --namespace argocd \
  --create-namespace \
  --values ./clusters/kmgt/charts/argo-cd.yaml \
  --wait
The values file in question, ./clusters/kmgt/charts/argo-cd.yaml, contains a few settings to limit the deployment to the essential components only and also to set the password to admin for the purposes of the demo.
Once Argo CD has been installed correctly, as confirmed by this output:
kubectl -n argocd get poNAME READY STATUS RESTARTS AGE
argocd-application-controller-0 1/1 Running 0 13s
argocd-applicationset-controller-6c9d8ff878-248fv 1/1 Running 0 15s
argocd-redis-6b5b88f8c6-dkw8n 1/1 Running 0 15s
argocd-repo-server-8644c4759f-q7lhk 1/1 Running 0 15s
argocd-server-54cb6dcdd8-jdjts 1/1 Running 0 15sA few additional variables are required. First and foremost, I recommend that you clone or fork my code repository to adjust the cluster configuration values to suit your needs, as Argo CD will use it to retrieve information about the Applications or ApplicationSets in order to deploy them and configure the Cluster API Operator directly.
To do this, if you set your new repository to private mode, please generate a token – also known as a Personal Access Token (PAT) – to grant Argo CD permission to access it. This requires adding the following lines to your environment variables:
export ARGO_CD_REPOSITORY_URL=    # Your Git repository
export ARGO_CD_REPOSITORY_BRANCH= # Your Git repository branch
export ARGO_CD_REPOSITORY_TOKEN=  # PAT
Once the code has been pushed and the few files have been updated with your values, you can deploy all the necessary resources, templated with the values above:
envsubst < ./clusters/kmgt/resources/argo-cd-repository.yaml | kubectl -n argocd create -f -
envsubst < ./clusters/kmgt/resources/argo-cd-appproject.yaml | kubectl -n argocd create -f -
envsubst '${ARGO_CD_REPOSITORY_URL} ${ARGO_CD_REPOSITORY_BRANCH}' < ./clusters/kmgt/resources/argo-cd-application-capi-operator.yaml | kubectl -n argocd create -f - # This prevents the $values variable from being overwritten!
envsubst < ./clusters/kmgt/resources/argo-cd-applicationset-clusters.yaml | kubectl -n argocd create -f -
I therefore suggest a standard structure:
- A
Secretto configure access to the code repository; - An
AppProjectto centralise all the configuration in a folder within Argo CD and limit thesourceReposto avoid errors;
apiVersion: argoproj.io/v1alpha1
kind: AppProject
metadata:
  name: clusters
spec:
  description: "Clusters configuration"
  sourceRepos:
    - ${ARGO_CD_REPOSITORY_URL}
    - https://kubernetes-sigs.github.io/cluster-api-operator
[...]- The
Applicationfor the Cluster API Operator, created by fetching the official chart and mapping it to the values in the./clusters/kmgt/charts/cluster-api-operator.yamlfile:
apiVersion: argoproj.io/v1alpha1
kind: Application
metadata:
  name: cluster-api-operator
spec:
  project: clusters
  sources:
    - repoURL: "https://kubernetes-sigs.github.io/cluster-api-operator"
      chart: cluster-api-operator
      targetRevision: 0.27.0
      helm:
        valueFiles:
          - $values/clusters/kmgt/charts/cluster-api-operator.yaml
    - repoURL: ${ARGO_CD_REPOSITORY_URL}
      targetRevision: ${ARGO_CD_REPOSITORY_BRANCH}
      ref: values
[...]- And finally, the famous
ApplicationSet, used to create as manyApplications for deploying clusters as there are subfolders inclusters:
apiVersion: argoproj.io/v1alpha1
kind: ApplicationSet
metadata:
  name: clusters
spec:
  generators:
    - git:
        repoURL: ${ARGO_CD_REPOSITORY_URL}
        revision: ${ARGO_CD_REPOSITORY_BRANCH}
        directories:
          - path: clusters/*
[...]
With the current configuration, the kmgt and kwkd clusters will be visible within Argo CD. But be careful – the Workload cluster configuration hasn’t been covered yet; that’s coming up!
The ApplicationSet is a useful resource in this scenario because adding a folder to clusters doesn’t require any changes to the configuration!
To access Argo CD, you can use port-forward and navigate through the interface to deploy the latest version of the Cluster API Operator and ensure that the kmgt cluster is visible:
kubectl -n argocd port-forward svc/argocd-server 8080:80The Management cluster is ready to put the deployment of clusters in GitOps mode into practice. This will enable you to go even further…
Another step towards 100% automation#
In Part 2, once the Management cluster had been deployed, there remained a highly manual step: it was necessary to install two essential components, namely Cilium and the Talos Cloud Controller Manager, for the node to reach the Ready state.
Furthermore, given the desire to adopt GitOps, it would be a shame to retain this helm install based step, because it undermines the principle of end-to-end automation.
That is why I propose adding a new component to the Cluster API Operator to automatically install Helm charts based on labels: the Cluster API Add-on Provider for Helm or CAAPH.
This add-on works with a dedicated resource, the HelmChartProxy, targeting clusters with a specific label and injecting a Helm chart with the desired values into them.
More details will follow in the next section, but the general idea is this: as soon as a Cluster with labels defined in a HelmChartProxy appears, CAAPH will take care of installing the relevant chart on that cluster. The node will therefore transition from NotReady to Ready entirely autonomously, without the need to run a single helm install command manually.
For example, if you create a HelmChartProxy to install Argo CD:
apiVersion: addons.cluster.x-k8s.io/v1alpha1
kind: HelmChartProxy
metadata:
  name: argocd
spec:
  clusterSelector:
    matchLabels:
      gitops: argocd
If your Cluster has a gitops: argocd label, the chart installation will run as soon as the API for that cluster is up and running.
If you have successfully resynchronised the Cluster API Operator in Argo CD, you should see the caaph-system namespace and the associated Pod:
kubectl get pods -A | grep caaph-systemNow, let’s move on to running commands and updating files!
Getting our hands dirty once again#
Workload cluster structure#
A Workload cluster is a set of nodes, some of them dedicated to Control Plane tasks, but there are also Workers! And this second part is completely new.
Before diving into the main topic, let’s take a look at what you need in terms of configuration to deploy the whole thing!
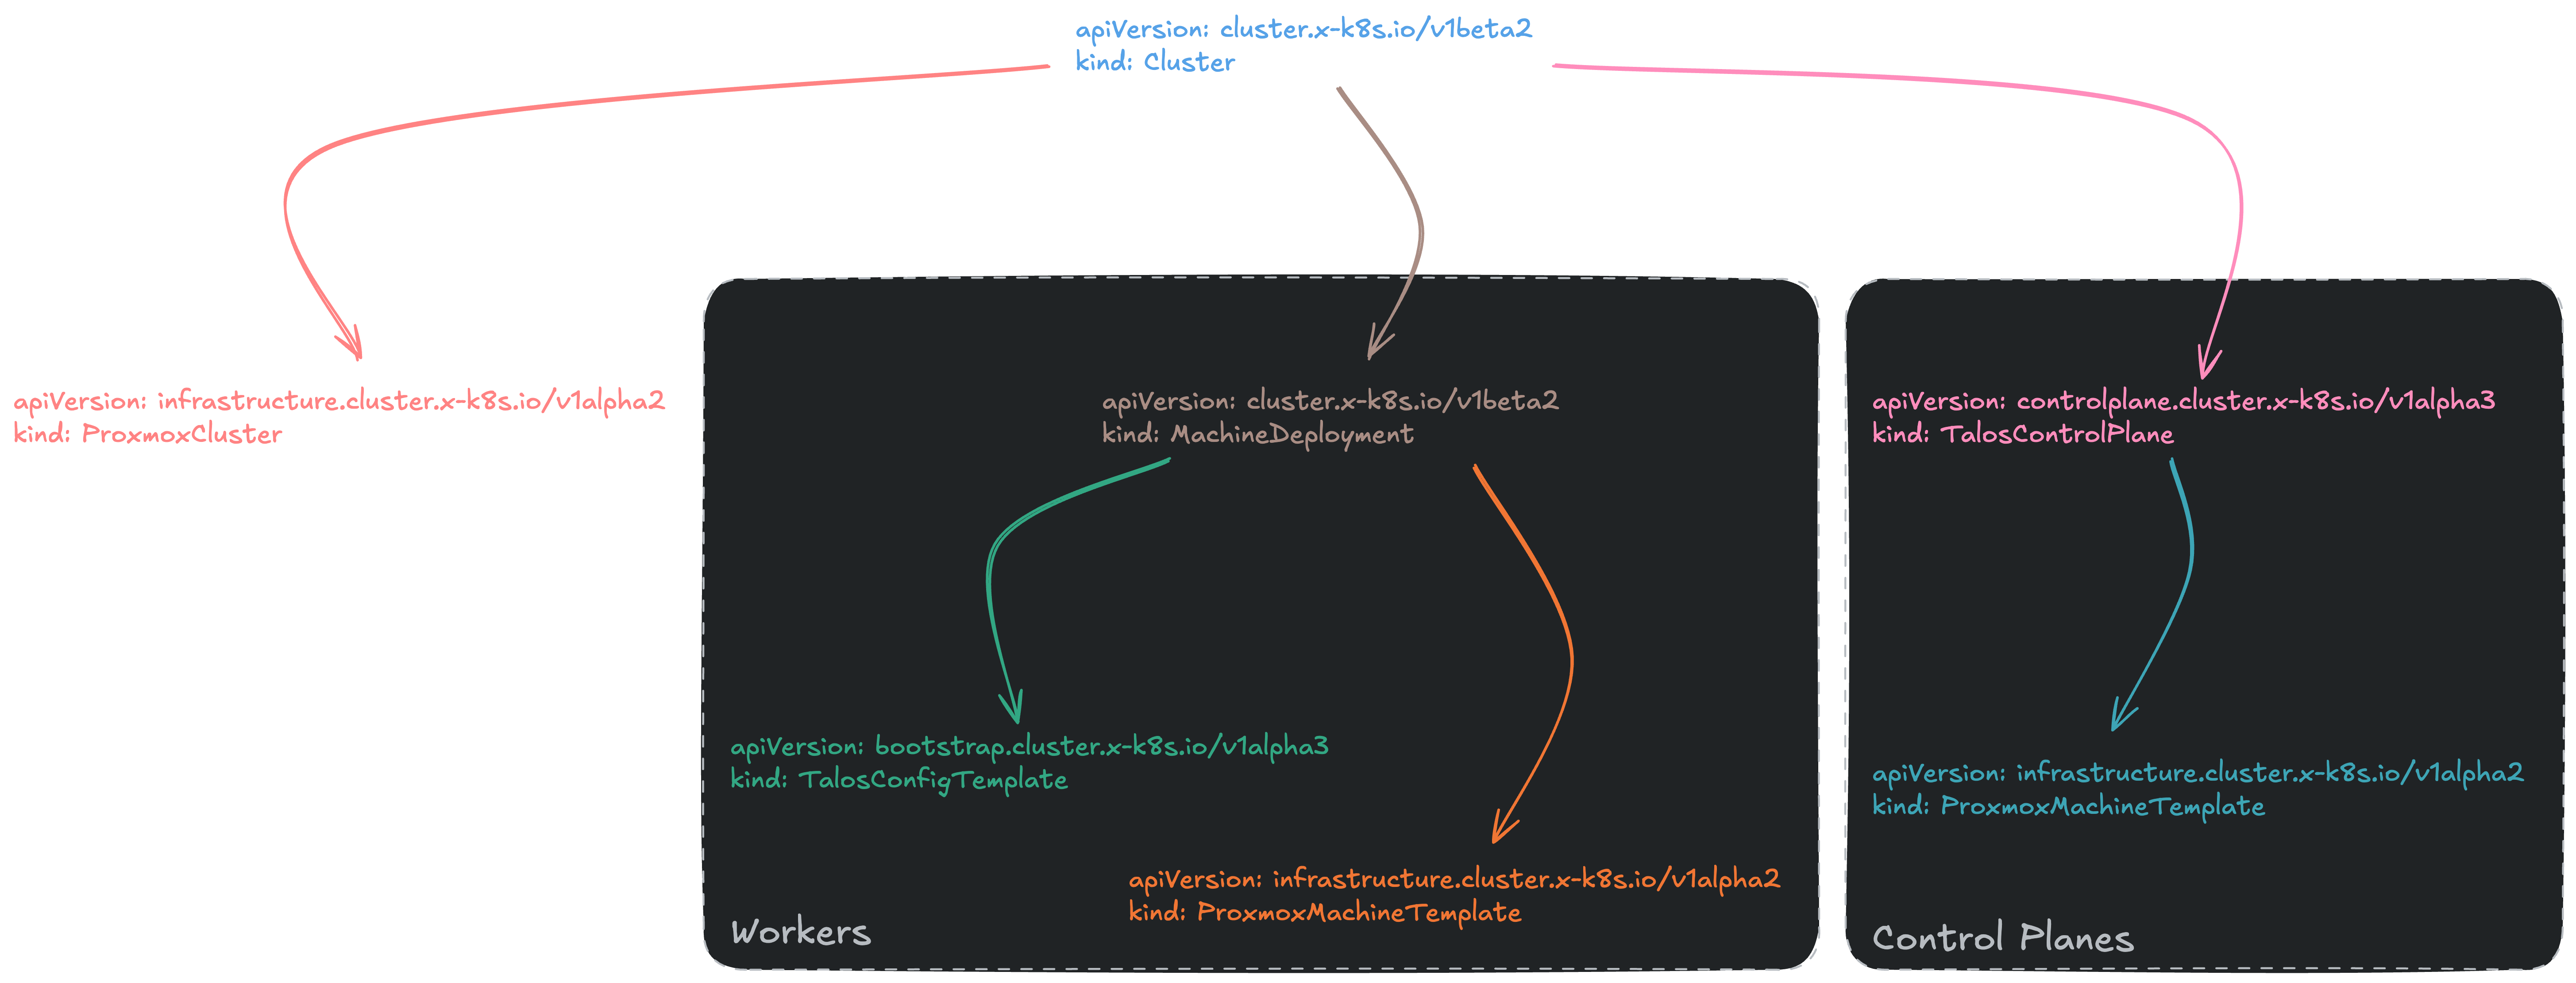
Complete structure of a Kubernetes cluster with resources for Control Planes and Workers
There’s no need to go through all the resources again; I’d suggest you re-read my article on the Management cluster to get an overview of the Cluster resources and those for the Control Planes.
As for the Workers, there are:
- The
MachineDeployment, bringing together the two components below to act as a link between the infrastructure (ProxmoxMachineTemplate) and the bootstrap (TalosConfigTemplate), enabling the node(s) to be initialised. Not to mention the link to the cluster via theclusterNamefield, as well as certain attributes relating to the number of nodes (replicas) or the Kubernetes version (version). Finally, as you can see, this resource is designed to designate a set of nodes with the same properties, but it is entirely possible to create several differentMachineDeploymentresources for a singleCluster:
apiVersion: cluster.x-k8s.io/v1beta2
kind: MachineDeployment
[...]
spec:
  clusterName: kwkd
  replicas: 1
  template:
    spec:
      clusterName: kwkd
      version: v1.36.2
      infrastructureRef:
        apiGroup: infrastructure.cluster.x-k8s.io
        [...]
      bootstrap:
        configRef:
          apiGroup: bootstrap.cluster.x-k8s.io
[...]- The
TalosConfigTemplate, as with the Control Planes, allows you to override the default Talos Linux configuration by adding different types of features via thestrategicPatchesfield, while specifying that this configuration must be tailored for Workers:generateType: worker. The settings are intended to be less verbose than what you saw previously, as Workers do not contain specific components such as the API Server or others:
apiVersion: bootstrap.cluster.x-k8s.io/v1alpha3
kind: TalosConfigTemplate
[...]
spec:
  template:
    spec:
      generateType: worker
      talosVersion: v1.13.7
      strategicPatches:
        - |
          machine:
            install:
              disk: /dev/sda
              extraKernelArgs:
                - net.ifnames=0
            network:
              interfaces:
                - deviceSelector:
                    busPath: "0*"
                  dhcp: false
            kubelet:
              extraArgs:
                cloud-provider: external
rotate-server-certificates: true- The
ProxmoxMachineTemplateas with the Control Planes, the aim here is to define the technical specifications of the virtual machines: CPU, memory, network, disk space, template ID, tags, etc.
apiVersion: infrastructure.cluster.x-k8s.io/v1alpha2
kind: ProxmoxMachineTemplate
[...]
spec:
  template:
    spec:
      full: true
      sourceNode: proxmox
      templateID: 5001 # talos-v1.13.7-wk-tmpl
      format: qcow2
      numSockets: 1
      numCores: 2
      memoryMiB: 4096
[...]
Enough theory – it’s time to get the deployment underway!
Step-by-step deployment#
The first step is to run the script scripts/create-talos-template.sh within the Proxmox shell to create a template for the Workers, the difference lies in adding a data disk in case the Pods require persistent storage.
Next, you can connect to Argo CD from the management cluster using the port-forward command, ensuring you use the correct kubeconfig:
kubectl -n argocd port-forward svc/argocd-server 8080:80As mentioned above, the Workload cluster, referred to here as kwkd, has a folder named after it containing the configuration in clusters/kwkd/config.yaml.
It is important that you take the time to amend the settings – particularly the network ones – to match your addressing on the ProxmoxCluster side:
apiVersion: infrastructure.cluster.x-k8s.io/v1alpha2
kind: ProxmoxCluster
[...]
spec:
  allowedNodes:
    - proxmox
  controlPlaneEndpoint:
    host: 192.168.1.151
    port: 6443
  dnsServers:
    - 192.168.1.1
  ipv4Config:
    addresses:
      - 192.168.1.130-192.168.1.140
    gateway: 192.168.1.1
And don’t forget the Control Plane’s VIP, otherwise the cluster will get stuck during initialisation:
apiVersion: controlplane.cluster.x-k8s.io/v1alpha3
kind: TalosControlPlane
[...]
spec:
[...]
      strategicPatches:
        - |
          [...]
            network:
              interfaces:
                - deviceSelector:
                    busPath: "0*"
                  dhcp: false
                  vip:
                    ip: 192.168.1.151 # This must match the controlPlaneEndpoint.host
One last thing: the two HelmChartProxy items at the end of the file, allowing you to install Cilium and the Talos Cloud Controller Manager to create a ready-to-use cluster:
apiVersion: addons.cluster.x-k8s.io/v1alpha1
kind: HelmChartProxy
metadata:
  name: cilium
[...]
spec:
  clusterSelector:
    matchLabels:
      cni: cilium # Important
  repoURL: https://helm.cilium.io/
  chartName: cilium
  version: 1.19.6
  releaseName: cilium
  namespace: kube-system
  valuesTemplate: |
    operator:
      replicas: 1
[...]apiVersion: addons.cluster.x-k8s.io/v1alpha1
kind: HelmChartProxy
metadata:
name: talos-cloud-controller-manager
namespace: kwkd
spec:
clusterSelector:
matchLabels:
ccm: talos # Important
repoURL: "oci://ghcr.io/siderolabs/charts"
chartName: talos-cloud-controller-manager
version: 0.5.5
releaseName: talos-ccm
namespace: kube-system
valuesTemplate: |
nameOverride: cloud-controller-manager
fullnameOverride: cloud-controller-manager
enabledControllers:
- cloud-node
- node-csr-approvalThe clusterSelector field is therefore crucial, as it provides the labels that will be used to determine where the chart will be installed.
In the case of the kwkd Cluster, unsurprisingly, both need to be installed:
apiVersion: cluster.x-k8s.io/v1beta2
kind: Cluster
metadata:
  name: kwkd
  namespace: kwkd
  labels:
    cni: cilium
    ccm: talos
Finally, on the Argo CD side, all that remains is to synchronise the cluster-kwkd and watch the resources being created one by one to deploy the very first Workload cluster!
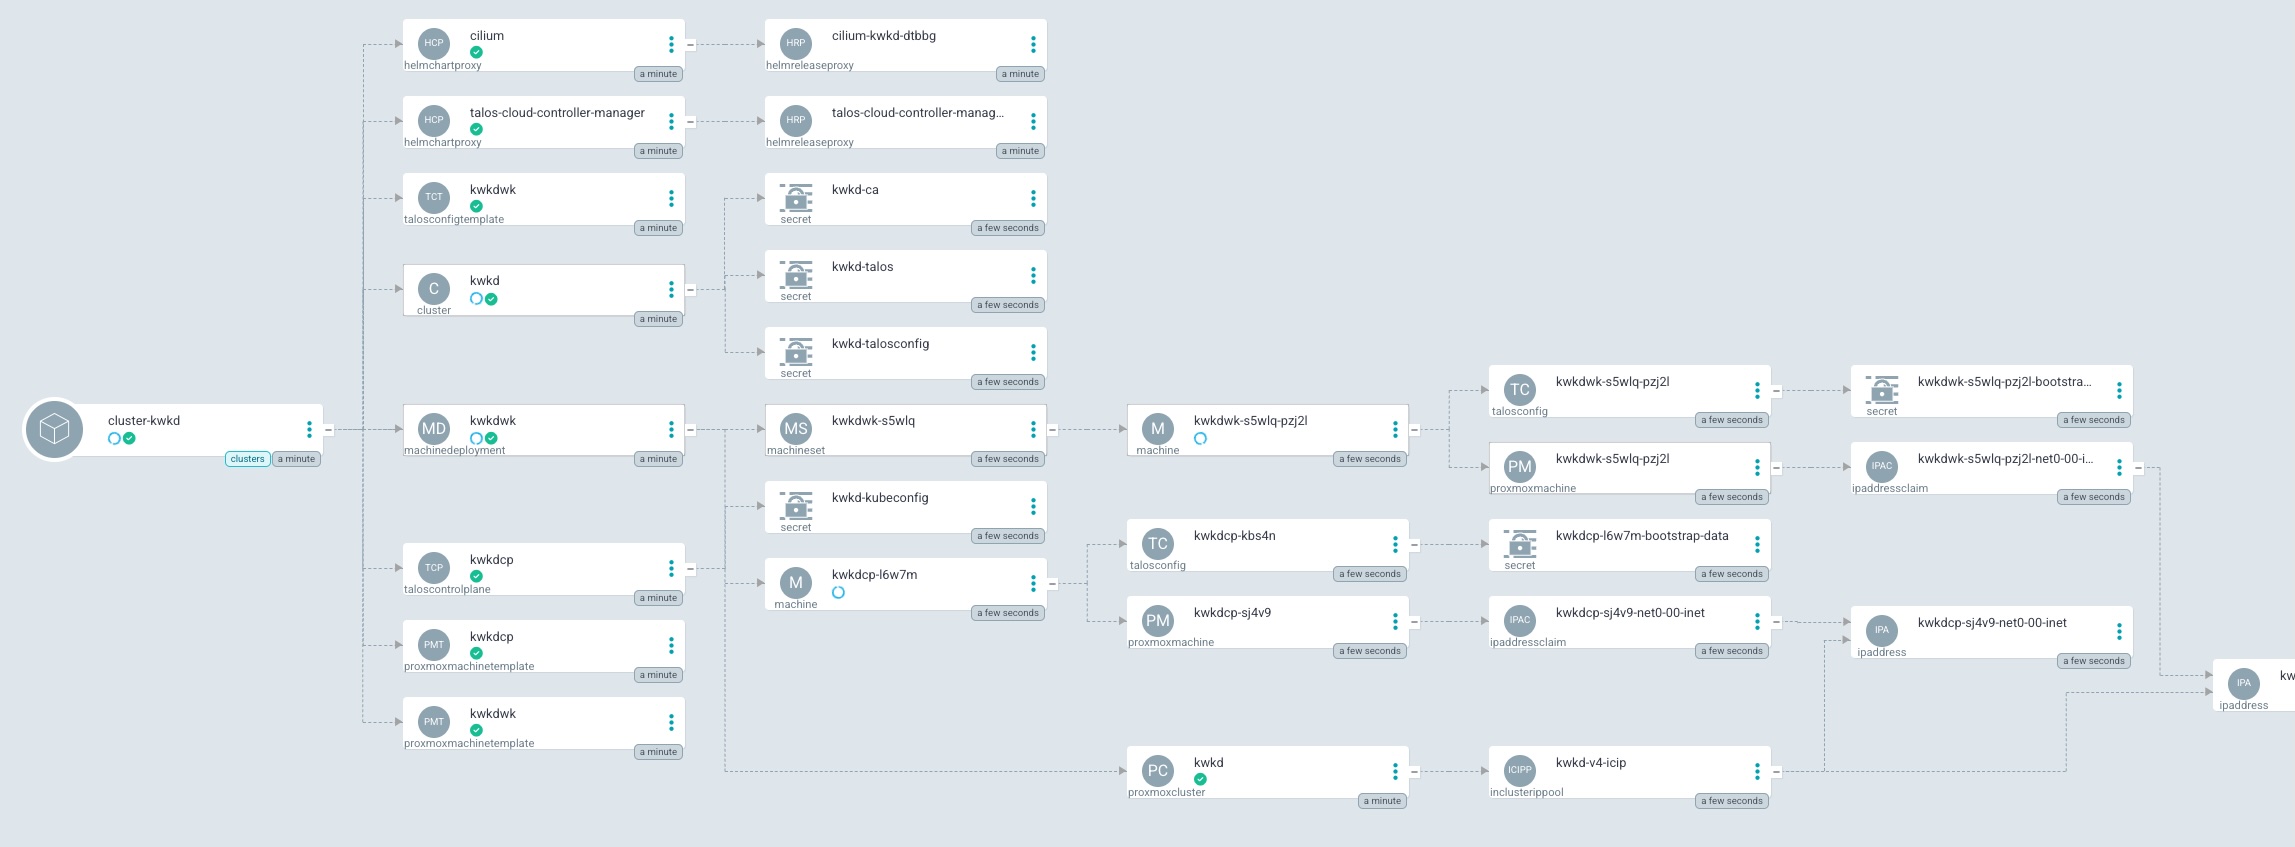
After a few minutes, everything should be up and running with the status Ready:
kubectl get nodes -o wideNAME STATUS ROLES AGE VERSION INTERNAL-IP EXTERNAL-IP OS-IMAGE KERNEL-VERSION CONTAINER-RUNTIME
kwkdcp-sj4v9 Ready control-plane 3m9s v1.36.2 192.168.1.130 <none> Talos (v1.13.7) 6.18.39-talos (amd64) containerd://2.2.6
kwkdwk-s5wlq-pzj2l Ready <none> 3m12s v1.36.2 192.168.1.131 <none> Talos (v1.13.7) 6.18.39-talos (amd64) containerd://2.2.6If you want, you can take a look at the Helm charts applied to the cluster:
kubectl -n kwkd get helmchartproxiesNAME READY REASON
cilium True InfoReported
talos-cloud-controller-manager True InfoReportedIt is also possible to retrieve the kubeconfig and talosconfig files for kwkd from the Management cluster as follows:
export KUBECONFIG=./clusters/kmgt/kubeconfig.yaml

kubectl -n kwkd get secrets kwkd-kubeconfig -o=jsonpath='{.data.value}' | base64 -d > ./clusters/kwkd/kubeconfig.yaml
kubectl -n kwkd get secrets kwkd-talosconfig -o=jsonpath='{.data.talosconfig}' | base64 -d > ./clusters/kwkd/talosconfig.yaml
The circle is now complete! The Workload cluster is up and running, managed by the Management cluster!
The update step#
I’ve already mentioned version upgrades in the previous section; there are, in fact, two scenarios: updating the Kubernetes version and/or updating the Talos Linux version.
As you know, Cluster API manages updates transparently using a rolling update approach by creating new machines and phasing out the old ones, thereby ensuring there is no service interruption.
Using Argo CD and the GitOps approach makes things more visual, and I’d like to show you how it all fits together.
In itself, it’s not complicated; if you take the case of a Kubernetes update, there are two fields to update: on the Control Planes side and on the Workers side.
As a matter of best practice, it is strongly recommended to update the Control Planes before starting the Workers to ensure, at the very least, that the nodes are compatible with the API Server.
Here are the two lines to modify in the clusters/kwkd/config.yaml file; let’s start with the Control Planes:
apiVersion: controlplane.cluster.x-k8s.io/v1alpha3
kind: TalosControlPlane
metadata:
  name: kwkdcp
[...]
spec:
  version: v1.36.3 # Previous value: v1.36.2
Not to mention the Workers:
# Workers
apiVersion: cluster.x-k8s.io/v1beta2
kind: MachineDeployment
metadata:
  name: kwkdwk
[...]
spec:
[...]
  template:
    spec:
      clusterName: kwkd
      version: v1.36.3 # Previous value: v1.36.2
And one commit and one push later, all that’s remaining is to start the synchronisation in Argo CD and watch the update get underway…
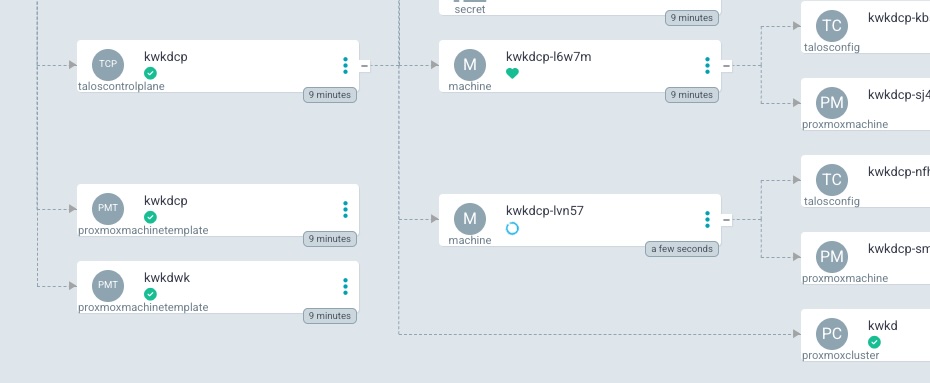
Updating Control Planes in Argo CD
Review and closing remarks#
This series on Cluster API is coming to an end…
Following a largely theoretical section covering concepts, architecture, an introduction to Talos Linux and how Cluster API works, the practical sections on deploying the Management cluster and the Workload cluster bring the series to a successful close.
I hope you’ve enjoyed this first series on the topic. It’s always important to me to combine theoretical concepts with hands-on lab-based exploration, particularly to gain a deeper understanding of all the ins and outs.
As you might expect, condensing this series into a single article would have been too much, or I would have had to omit sections that I consider essential.
Cluster API is a brilliant project that standardises the way Kubernetes clusters are deployed by adopting a fully “as code” approach to deploying infrastructure directly within Kubernetes, without the need for other languages or technologies on the market. As you’ve seen, combining this tool with the world of GitOps provides a genuine control centre from where you can manage and update an entire cluster, with operations reduced to modifying a few lines of code in Git. It’s a real pleasure when you’re responsible for the Run of this kind of platform.
Furthermore, Cluster API’s strength lies in its modular, ‘puzzle-like’ design, enabling users to select each provider according to their needs, thereby increasing flexibility should they wish to switch hypervisors, change cloud providers or even switch Kubernetes distributions…
I highly recommend it, even if the initial migration does come at a cost!
Please feel free to share your feedback and experiences with Cluster API and its components, whether on LinkedIn or your preferred platform!