
The limits of Kubernetes#
Kubernetes has largely established itself and transformed how containerised applications are operated today. As I’ve described across several of my blog posts, it provides advanced mechanisms for orchestrating containers and exposing them through Services, Ingress, or more recently as Routes via the Gateway API.
Behind this functionality lies a deliberately simple and permissive network model: all Pods can communicate with each other without restrictions, regardless of their namespace, as described in the Kubernetes networking model.
This design choice has an obvious advantage: it facilitates application and tool deployment in development environments and reduces initial complexity. However, in production, this quickly becomes a major security concern. For example, in a cluster shared between multiple teams or hosting critical components, nothing prevents a compromised or misconfigured Pod from scanning the network or accessing internal services that shouldn’t be exposed.
Kubernetes provides a mechanism to address this: the NetworkPolicy object. This allows restricting network flows by granting only certain communications, but these operate solely at OSI model layers 3 and 4 - on IPs and/or ports.
The NetworkPolicy is primarily designed for developers deploying applications in Kubernetes at a particular namespace. It uses a mechanisms based on labels (namespaces or Pods) or IP address ranges. This remains quite limiting and doesn’t allow filtering on API paths or REST methods calling your application.
If you want to systematically encrypt communications between Pods to avoid unencrypted traffic, this represents a huge challenge… Consider the various steps involved: certificate generation, automatic rotation, deployment of certificates within Pods. These operations quickly become unmanageable at the cluster level with dozens or even hundreds of microservices, not to mention the significant risk of error.
Finally, a point often overlooked: observability. Having an overall view of your network is important for understanding and diagnosing potential issues such as timeouts, HTTP error codes, or blocked flows.
Service Mesh, the answer#
As you may have understood, the solution to these issues mentioned above is called: Service Mesh.
In Kubernetes, a Service Mesh is an infrastructure layer positioned between your workloads and the network. It handles intercepting, securing, observing, and managing communications between Pods.
This concept has a crucial advantage: there’s no need to update application code! It becomes possible to benefit from a set of features without modifying your applications.
Speaking of which, here are the main features of this type of tool:
Security policy implementation: Service Mesh allows defining and applying various rules across all services. For example: quotas, rate limiting, authentication, or access requiring specific authorisations;
Resilience and fault tolerance: When a service becomes unavailable or responds slowly, Service Mesh provides different capabilities: it automates retries and fallbacks, and can redirect traffic to other available instances with the sole purpose of preserving application availability;
Communication encryption: Mutual TLS (mTLS) automatically encrypts exchanges between Pods. This feature comes with mechanisms that let you create and renew certificates on the fly without any specific action;
Intelligent traffic management: Service Mesh provides advanced routing capabilities, enabling traffic direction based on load, versions, or even specific rules. Several strategies can be defined: canary deployment to redirect a small portion of traffic to a new version, or request mirroring if traffic can be duplicated for testing purposes without impacting the environment involved;
Observability: To have an overall view of network traffic, Service Mesh provides indicators in the form of metrics, logs, and traces aiming to increase visibility in order to investigate potential latencies, HTTP error codes, or get an idea of request volume.
To sum it up, Service Mesh delivers a range of features that enhance security, increase visibility, provide control over traffic management, and ensure resilience once configured.
Regarding tools offered within the Cloud Native Computing Foundation ecosystem, two products have graduated status, demonstrating maturity and confidence for deployment in production contexts.
Istio is often considered the industry standard: rich in advanced features for security, routing, and observability. However, it can be complex to configure and operate.
Linkerd stands out for its lightness and installation simplicity: this solution offers a minimalist approach, ideal for teams wanting an operational Service Mesh with essential features like mTLS and service monitoring.
Istio, a journey into the Service Mesh#
Among Service Mesh solutions, Istio stands out through its numerous features and deployment flexibility.
It is primarily an open source project deeply involved in the CNCF and Kubernetes ecosystem. I had the opportunity to discover it through multiple conferences such as KubeCon, particularly when the Ambient mode was released.
From an installation perspective, Istio consists of a series of Helm charts to deploy. Installation via the official operator has been deprecated since version 1.23, knowing that the latest version is 1.27.1. Nevertheless, Red Hat has announced the creation of a Sail Operator to continue deploying Istio in this format. Please note that it is not maintained by the Istio project itself.
From an architectural perspective, Istio consists of two main groups:
The control plane (Istiod) orchestrates and dynamically configures the data plane proxies, ensuring centralised management of their configurations.
The data plane (Sidecar/Ambient) groups all proxies that intercept, control, and direct network communications between Pods. They also play a key role in telemetry by collecting and reporting detailed information about all Service Mesh traffic.
It provides two operating modes: Sidecar mode, where an Envoy proxy is attached to each Pod, and Ambient mode, introduced more recently, using one proxy per cluster node. Both modes clearly have their advantages and drawbacks, as discussed later.
Let’s examine these two modes in depth, starting with Sidecar.
Traditional mode: Sidecar#
Sidecar mode represents Istio’s traditional deployment approach.
In this way, each Pod has an additional container associated with it: an Envoy proxy that intercepts all incoming and outgoing traffic. Through this interception, this allows for the integration of advanced features from OSI model layer 4 up to layer 7.
This approach provides access to advanced features such as conditional routing, canary deployment, and request mirroring.
Sidecar also provides highly detailed observability. The metrics, logs, and traces collected by Envoy enable deep monitoring of application behaviour, analysis of latency, error rates, and resource consumption, thereby allowing rapid detection of network anomalies.
However, this collection of features comes at a cost. Injecting a proxy per Pod results in significant additional resource overhead (CPU and memory) and can rapidly increase operational complexity, particularly on very large clusters with high Pod volumes where node resources can disappear like snow in sunshine.
Proxy consumption therefore represents one of the aspects to consider before choosing this approach.

Istio with Sidecar data plane
Communications between Pods must be routed through the Envoy containers before being addressed to the main container.
To inject the Sidecar, Istio provides an annotation mechanism:
kubectl label namespace backend istio-injection=enabledThis will inject the famous Sidecar into all Pods in the backend namespace.
New concept: Ambient#
Why Ambient?#
Ambient introduced by Istio 1.22 in 2022 is not intended to replace Sidecar mode but to provide an alternative approach to address requirements concerning Envoy container resource consumption on each Pod.
Even though Istio Ambient is considered stable whilst maintaining numerous features for network control and security, there are some points to consider. At the moment, multi-cluster has only just been released in alpha.
I therefore recommend that you take a close look at the limitations of this mode and the comparison between Sidecar and Ambient to see if it suits your needs.
Architecture#
The data plane architecture for Ambient mode relies on two main components:
Ztunnel is a shared proxy operating at layer 4 (TCP and UDP) deployed on each node. It intercepts all traffic between Pods to ensure mTLS encryption and apply access policies also called AuthorizationPolicy. Unlike Sidecar, the Ztunnel proxy does not inspect layer 7 content, but guarantees network isolation and security without deploying an additional container in each Pod.
Each workload passing through Ztunnel is associated with a SPIFFE (Secure Production Identity Framework For Everyone) identity. This enables strong authentication of each Pod, encryption of communications (mTLS), and secure communication between them.
Waypoint is an optional component based on the Envoy proxy. Why optional? Because only Ztunnel is necessary for Ambient mode, but you would miss out on features available by inspecting OSI model layer 7, such as the ability to filter on URL paths or inspect request headers.
These Waypoints have a particular characteristic: they are deployed as Gateway using Gateway API CRDs as I explained in my previous article.
This brings a major advantage: the ability to finely configure these proxies to scale them when needed. You can deploy one Waypoint gateway per namespace or have a shared cross-namespace gateway to avoid over-consuming resources.
It is clearly possible to configure the Waypoint gateway only when it makes sense for your workloads thanks to an annotation system.
The main advantage of Ambient mode lies in the sharing of these components within the data plane, drastically reducing Istio’s CPU and memory footprint on the Kubernetes cluster side without compromising essential security features.

Istio with the Ambient data plane, using Ztunnel
As mentioned above, all communications are routed through Ztunnel, even within the same node. This is the case in this diagram on worker 2. However, if the frontend and backend Pods are positioned on different workers, traffic passes through the Ztunnel of each of the two nodes to reach its destination.

Istio with Ambient data plane with Waypoint gateway
As you can see with the Ztunnel and Waypoint combination, traffic is intercepted and redirected by Ztunnel to then be routed to the Waypoint gateway before finally traversing Ztunnel again and reaching the called Pod.
Installation#
As mentioned above, Istio Ambient installation relies on a set of charts to deploy. These charts can be managed with or without the istioctl CLI.
- base: for the various Istio-specific CRDs;
- istiod: for deploying the control plane;
- cni: for initialising Istio’s network layer, compatible with all Container Network Interface (CNI) solutions on the market;
- ztunnel: for installing one proxy per Kubernetes cluster node;
- gateway: optional but essential for deploying Waypoints and thus benefiting from layer 7 features.
Note that during installation, the istiod and cni charts must be initialised with profile: ambient as values.
Once components are deployed, traffic interception is also performed using an annotation mechanism applied to a namespace:
kubectl label namespace backend istio.io/dataplane-mode=ambientTo benefit from the Waypoint component, additional annotations need to be applied:
# "waypoint" must be replaced with the name of your gateway
kubectl label namespace backend istio.io/use-waypoint=waypoint
# Add this if Waypoints are in a different namespace from your Pods
kubectl label namespace backend istio.io/use-waypoint-namespace=istio-system
Visibility with Kiali#
Kiali is an open source dashboard designed specifically for Istio. It provides a graphical view of the Service Mesh by exposing the topology of services and Pods, their interactions and dependencies. Concretely, Kiali consumes metrics collected by Prometheus and traces from Istio, then aggregates them to create graphs depicting all network traffic for one or several given namespaces.
The use of Kiali quickly becomes essential once a service mesh reaches several dozen workloads. Although Ztunnel and Envoy proxies already generate rich data (latency, error rates, traffic volume), analysing this raw data remains complex.
Kiali provides real-time visualisation of flows: it enables verification of traffic between services, identification of HTTP errors between two components, or immediate detection of latency spikes on a given request.
Kiali is the perfect visualisation tool when choosing to deploy Istio.
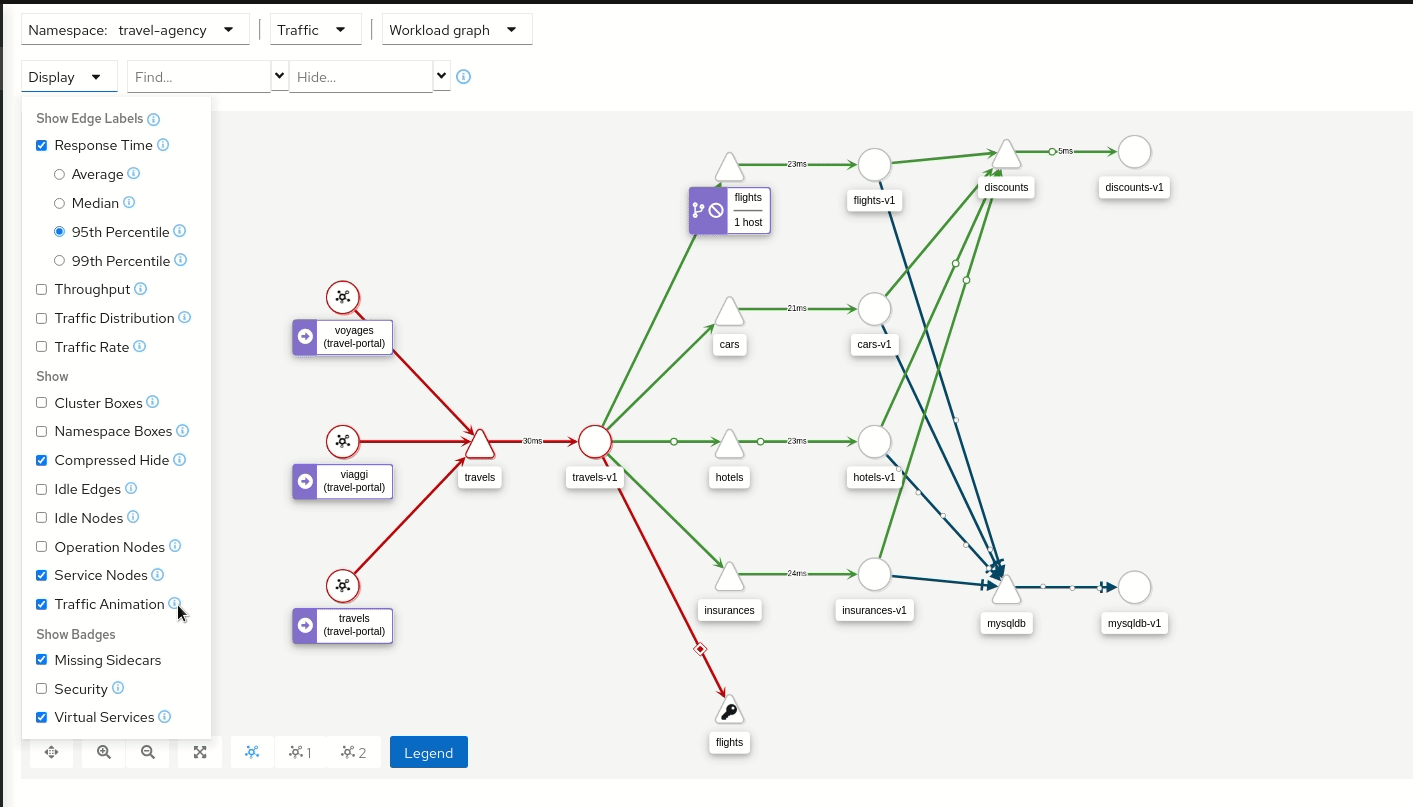
Kiali in action (image from kiali.io)
Security with Istio#
Security is one of the benefits of Service Mesh, and Istio provides a set of mechanisms for encrypting, authenticating, and controlling communications between your applications with the objective of adopting Zero Trust principles.
Enforcing mTLS#
Once Istio is deployed and configured, regardless of the chosen mode, mTLS operates transparently. It is recommended to apply an object called PeerAuthentication to enforce traffic encryption in mTLS per namespace:
apiVersion: security.istio.io/v1
kind: PeerAuthentication
metadata:
  name: mtls
  namespace: backend
spec:
  mtls:
    mode: STRICT
Or on a given workload, represented with the label app: backend:
apiVersion: security.istio.io/v1
kind: PeerAuthentication
metadata:
  name: mtls
  namespace: workloads
spec:
  selector:
    matchLabels:
      app: backend
  mtls:
    mode: STRICT
AuthorizationPolicy and Zero Trust#
To go beyond Kubernetes’ NetworkPolicy, Istio provides a custom resource called AuthorizationPolicy. These have an huge advantage: they can control ingress flows through an identity mechanism based on Kubernetes service accounts and go much further than filtering on labels and IPs.
Thanks to this object, it is also possible to filter traffic at layer 7 by specifying URL paths or REST methods, for example.
In the case of Ambient mode, there are two types of AuthorizationPolicy:
Those associated with Ztunnel and therefore layer 4 only, and those attached to Waypoints. The latest can have many more features.
Here is an example of an access policy associated with Ztunnel:
apiVersion: security.istio.io/v1
kind: AuthorizationPolicy
metadata:
  name: api
  namespace: backend
spec:
  selector:
    matchLabels:
      app: api
  action: ALLOW
  rules:
  - from:
    - source:
        principals:
        - "cluster.local/ns/frontend/sa/website"
    to:
    - operation:
        ports: ["8080"]
In this case, Pods bearing the website service account within the frontend namespace are authorised to communicate on port 8080 with the Pod having the label app: api in the backend namespace.
The selector indicates that this is an AuthorizationPolicy adopted by Ztunnel only and limited to layer 4.
If you want to apply this AuthorizationPolicy to a Waypoint gateway to benefit from advanced features, the structure changes:
apiVersion: security.istio.io/v1
kind: AuthorizationPolicy
metadata:
  name: api
  namespace: backend
spec:
  targetRefs:
  - kind: Service
    group: ""
    name: api
  action: ALLOW
  rules:
  - from:
    - source:
        principals:
        - "cluster.local/ns/frontend/sa/website"
    to:
    - operation:
        ports: ["8080"]
        methods: ["GET"]
        paths: ["/orders"]
The selector is replaced by targetRefs of type Service to link the rule to the Kubernetes service named api. Since Waypoint operates at layer 7, it is possible to add fields like methods or paths to improve granularity and grant only what is strictly necessary.
Finally, these policies allow choosing the desired action type with quite a wide choice between ALLOW, DENY, AUDIT and CUSTOM.
spec:
  action: ALLOW
To conclude, AuthorizationPolicy does not aim to replace NetworkPolicy, but to complement its shortcomings by providing an additional security layer to adopt a Zero Trust philosophy on Kubernetes.
Even more features!#
Istio doesn’t stop there.
It is possible to take it a step beyond that, particularly with traffic management. Integrating the Gateway API makes things easier and makes it possible to use most of the concepts that Istio had defined via its own CRDs.
This is the case with request routing, originally available with a VirtualService, now integrates with an HTTPRoute by allowing weight definition for each backend:
apiVersion: gateway.networking.k8s.io/v1
kind: HTTPRoute
metadata:
  name: backend
spec:
  parentRefs:
  - group: ""
    kind: Service
    name: backend
    port: 8080
  rules:
  - backendRefs:
    - name: backend-v1
      port: 8080
      weight: 90
    - name: backend-v2
      port: 8080
      weight: 10
The backend service will have 10% chance of its traffic being routed to backend-v2.
It is also possible to perform mirroring and duplicate traffic to backend-v2 without impacting application functionality, again with an HTTPRoute:
apiVersion: gateway.networking.k8s.io/v1
kind: HTTPRoute
metadata:
  name: backend
spec:
  parentRefs:
  - group: ""
    kind: Service
    name: backend
    port: 8080
  rules:
  - filters:
    - type: RequestMirror
      requestMirror:
        backendRef:
          name: backend-v2
          port: 8080
    backendRefs:
    - name: backend-v1
      port: 8080
The idea is not to enumerate every possibility, but to demonstrate that Istio comes with a range of features being gradually integrated into the Gateway API standard, proving its persuasive position.
Conclusion#
Service Mesh is now an essential component for any company wishing to operate containerised applications in production. It addresses the major challenges associated with communication between microservices: fine-grained traffic management, observability and resilience.
Available tools on the market have reached sufficient maturity levels for adoption. In the case of Istio, they can be complemented by Kiali to obtain detailed visibility of network flows.
Security is a major asset in Istio, particularly for establishing systematic mTLS encryption of traffic or implementing Zero Trust policies carried by AuthorizationPolicy.
As you can see, Istio Ambient reduces CPU and memory footprint compared to Sidecar, making Service Mesh installation much less resource-intensive and accessible for large clusters with numerous Pods.
From my perspective, adopting a Service Mesh is no longer a long-term option, but an indispensable tool for addressing certain Kubernetes limitations and confidently operating applications in production.